Wed., Jan. 17, 2007
The Experiment #1 materials were
handed
out today. Reports will be due on Monday Feb. 5. It may
take several days to collect the data, so don't wait until the last
minute to begin this experiment. Once you have collected the data
you need, return the materials and pick up the supplementary
information sheet that will help with the analysis portion of your
report. You'll find a little more information about Experiment #1
at the end of today's online notes.
Some additional reading was assigned
from Chapter 1.
We finished up the material on CO2, global warming and
climate change
that was started last Friday. You'll find that material together
with the rest of the Fri., Jan. 12 notes.
The next
section in Chapter 1 deals with the vertical structure of the
atmosphere. We will look at how characteristics such
as air temperature, pressure, and density vary with changing altitude
in the atmosphere. We'll start with temperature because that is
the property that you are most familiar with.
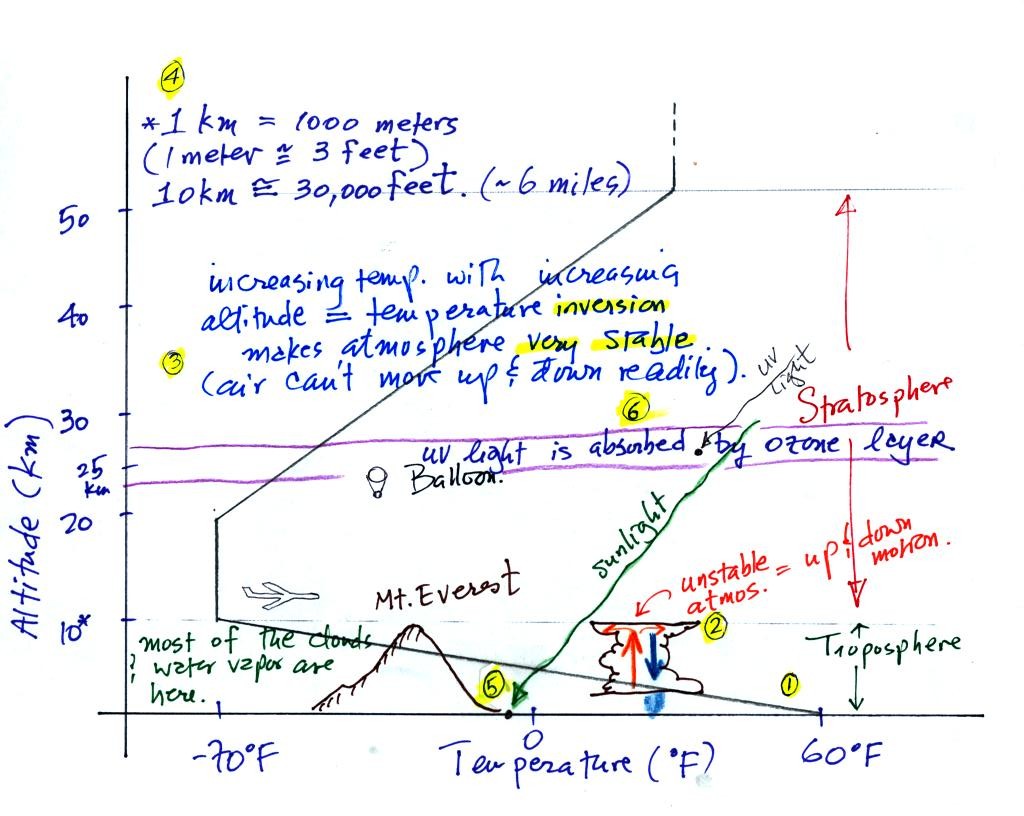
The atmosphere can be split
into layers
depending on whether
temperature is increasing or decreasing with increasing altitude.
The two lowest layers are shown in the figure above. (the numbers
1 - 6 were added after class
to aid with the discussion of this
figure)
1. We live in
the troposphere. The troposphere is found, on average, between 0
and about 10 km altitude, and is where temperature usually decreases
with
increasing altitude.
2. The troposphere contains most of the water vapor
in the atmosphere and is where most of the weather occurs. The
troposphere can be stable or unstable (tropo means to turn over and
refers to the fact that air can move up and down in the
troposphere). The thunderstorm shown in
the figure indicates unstable conditions, meaning that strong up and
down air motions are occurring. When the thunderstorm reaches the
top of the troposphere, it runs into the stable stratosphere. The
air can't continue to rise into the stable stratosphere so the cloud
flattens out and forms an anvil (anvil is the name given to the flat
top of the thunderstorm).
3. Temperature remains constant between 10 and 20 km and then
increases with increasing altitude between 20 and 50 km. These
two sections comprise the stratosphere. The stratosphere is a
very stable air layer.
Increasing temperature with increasing altitude is called an
inversion. This is what makes the stratosphere so stable.
Thinner inversion layers are sometimes found at ground level. When
pollutants are emitted into a shallow surface inversion layer, the
pollutant concentrations can build and reach unhealthy levels.
4. 10 km (kilometers) is approximately 30,000 feet.
At
nearly just over 29,000 feet altitude, the summit of Mt.
Everest is near the top of the troposphere. Commercial aircraft
fly at cruising altitudes between 30,000 and 40,000 feet. This is
right at the boundary between the top of the troposphere and the bottom
of the stratosphere.
5. Most of the sunlight arriving at the top of
the atmosphere passes through the atmosphere and is absorbed at the
ground. This warms the ground. The air in contact with the
ground is warmer than air higher up and further from the ground (in the
troposphere anyway).
6. How do you explain increasing temperature with increasing
altitude in the stratosphere. The ozone layer is found in the
stratosphere (peak concentrations are found near 25 km altitude).
Absorption of
ultraviolet light by ozone warms the air in the stratosphere and
explains why the air can warm. The air in the stratosphere is
much less dense (thinner) than in the troposphere. It doesn't
take as much energy to warm this thin air as it would to warm denser
air closer to the ground.
This is
probably a good place to learn more about ozone in the
stratosphere and in the troposphere.
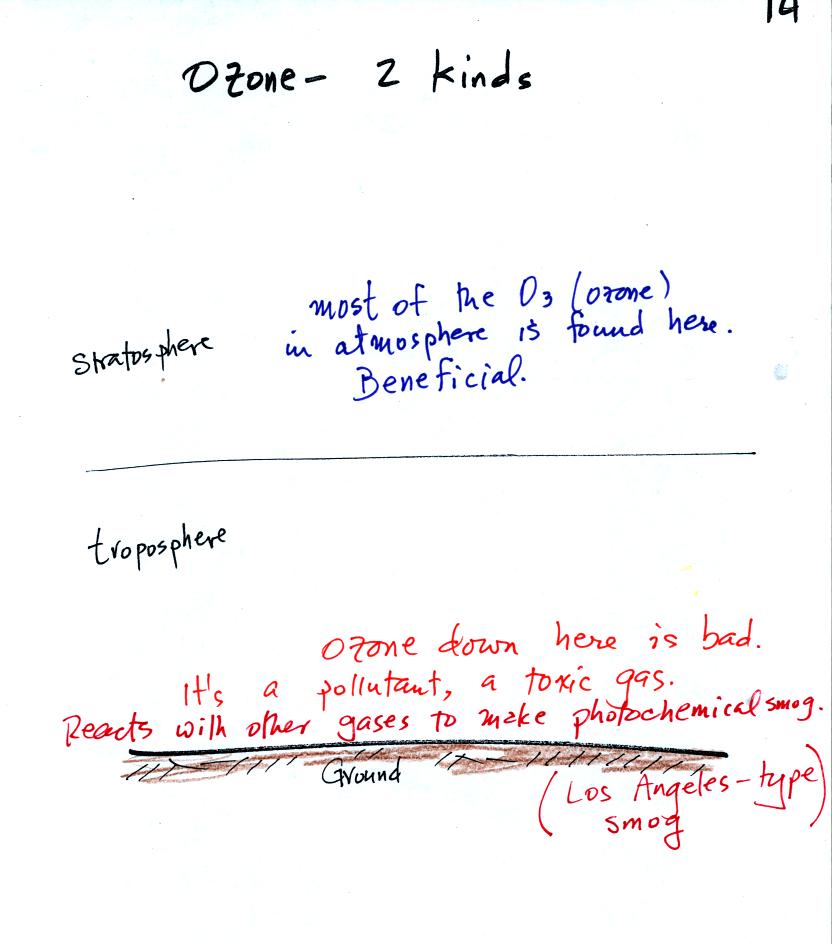
Ozone plays both beneficial and detrimental roles in our
atmosphere. Most of the ozone is found in the stratosphere where
it absorbs dangerous high energy ultraviolet (UV) light.
Ozone is toxic and, when found in the troposphere (where we live), it
is
hazardous (particularly to people with existing respiratory
disease). Tropospheric ozone also reacts with hydrocarbons in the
air to form photochemical smog.

Stratospheric ozone forms naturally when UV light splits oxygen
molecules (O2) into two oxygen atoms
(photodissociation). The O atoms can
then react
with unsplit O2 to make O3 ozone. The figure
above and the figure below are found on p. 17 in the photocopied
classnotes.
Three ways in which is destroyed naturally are shown in the figure
above. The absorption of UV light by either oxygen or ozone is
what protects us from this dangerous component in sunlight.
Once you understand how stratospheric ozone is formed you can
appreciate why the peak concentrations are found not at the bottom or
top of the atmosphere but at some level in between (at around 25 km),
where there are optimal amounts of oxygen and UV
light.

As
mentioned earlier, the Experiment #1 materials were handed out
today. We spent the last 10 minutes of class learning a little
bit about Experiment #1. This should be helpful to the students
actually working on the experiment and will give other students a
better idea of what lies ahead when they will be performing an
experiment and writing a report.
With this and the other experiments you will receive most or
all of the
materials you need to complete the experiment, a description of what
should go into your report, instructions that tell you how to perform
the experiment, and a data collection sheet.
The object of Experiment #1 is to measure the percentage concentration
of the oxygen in air (key words are
underlined and should appear in the report title). Basically you
moisten a piece of steel
wool, stick the steel wool into a graduated cylinder, and turn the
cylinder upside down and immerse the open end in a cup of water.
In that way you seal off the air sample (in the cylinder) from the rest
of the air in the atmosphere.
As the next figure shows air pressure will keep water out of the
cylinder if you just try to lower the open end of the cylinder into the
cup of water.
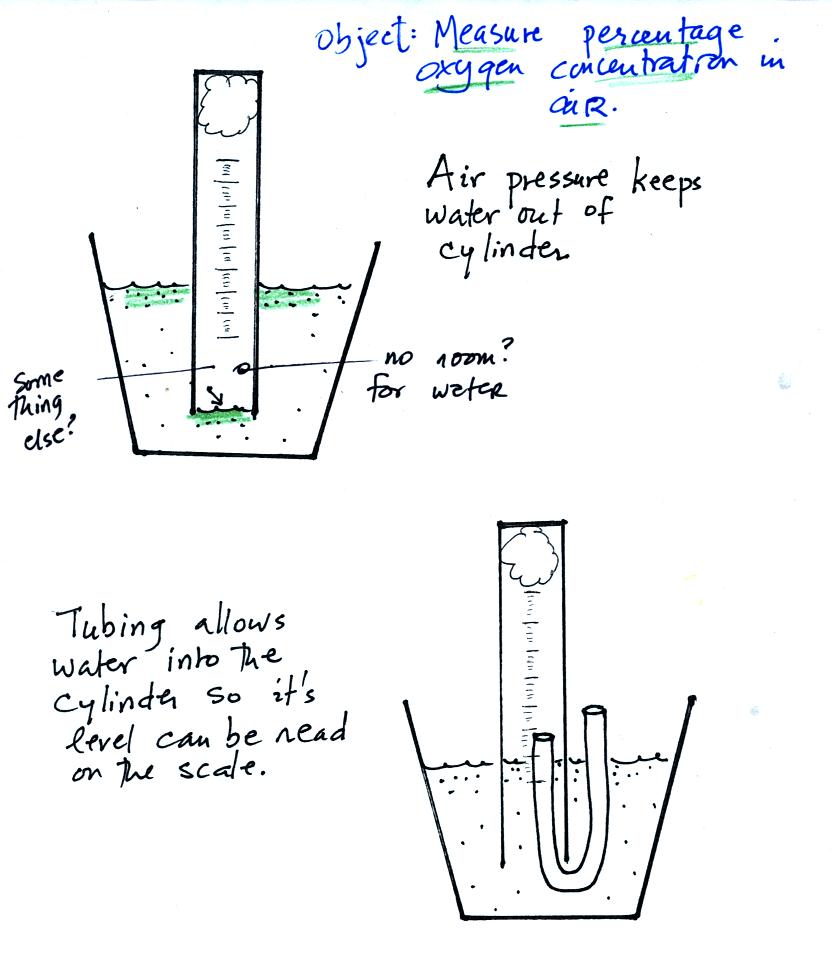
You need to insert a flexible piece of tubing into the cylinder and
then lower the cylinder into the water. The water will now rise
into the cylinder. You want the water to go just far enough into
the
cylinder that its level can be read on the cylinder scale. Then
be sure to remove the tubing.
With time the oxygen in the air sample in the cylinder will react with
the wet piece of steel wool to form rust. This removes oxygen
from the air sample. As oxygen is removed, the water level will
rise (the air sample volume will decrease). You will need to use
the ideal gas law to explain (in your report) why this occurs.
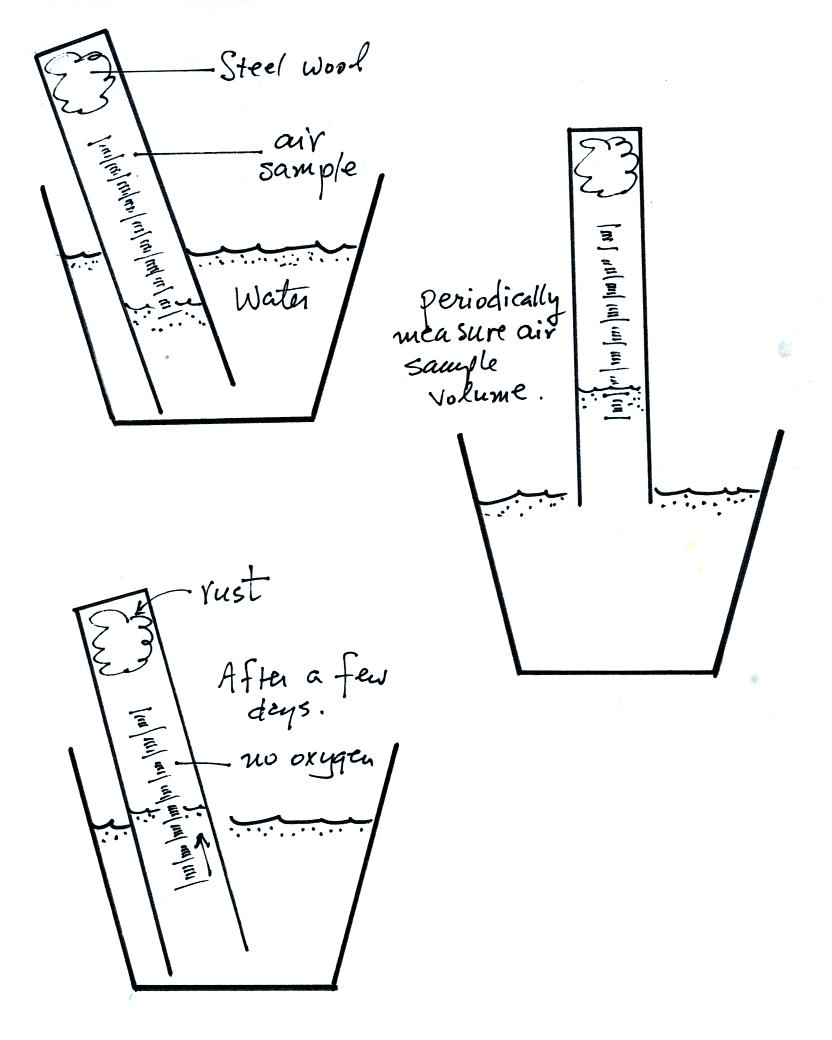
The reaction between the oxygen and the steel wool sometimes
happens in
a day or two. Other times it may take several days. You
will periodically need to record the time and the air sample volume (
you read the water level on the cylinder scale). Be sure you do
not lift the open end of the cylinder out of the water. That
would break the seal and you would need to restart the experiment.
Eventually the air sample volume will stop changing; all of the oxygen
has been removed from the air sample and the experiment is
over. You will receive a supplementary information sheet
when you have
returned your materials. You don't have to return the rusty piece
of steel wool - throw it away. Don't worry about trying to clean
the rust stains off the inside of the cylinder.