Thursday Oct. 5, 2017
Andrea
Bocelli with Elisa "La
Voce del Silenzio" (5:22), Elisa "Dancing"
(5:15), Andrea Bocelli with Laura Pausini "Dare
to Live" (5:09),
Elisa "Rock
Your Soul" (5:05),
Luciano Pavarotti & Sting "Panis
Angelicus" (3:45)
A couple of new assignments to be aware of:
A surface weather map analysis. You can earn either 1S1P
points (up to 10 pts) or Extra Credit points
(up to 0.4 pts)
New 1S1P topic - carbon dioxide
We'll finish up Section 9
stuck on the end of the Tue., Oct. 3
notes at the start of class today
10. Latent heat energy transport
This is the 3rd and the next-to-most important energy transport
process (probably also the hardest to understand).
If you had a hot object that you wanted to cool off quickly the
best thing might be to stick it into some water. That would
work first because water will conduct energy more rapidly than
air. Also, and this is the most important part, when a
really hot object is immersed in water, you'd probably hear a
brief sizzling sound, the sound of boiling water. A lot of
energy would be taken quickly from the hot object and used to boil
(evaporate) the water. A phase change means latent heat
energy transport is involved. The cooling in this case takes
only a few seconds. Latent heat is a very potent energy
transport process.
Latent heat energy transport is sometimes a little hard
to visualize or understand because the energy is "hidden" in water
vapor or water.

Latent heat energy transport involves
changes in phase or state. You need to be able to add
two types of information to this picture (this is p. 55 in
the ClassNotes): (i) You should be able to name each of the
phase changes shown above and (ii) You should also be able
to indicate whether energy must be added to or removed from
the material in order for each phase change to take
place. And actually there is a third thing, (iii),
that we'll get to in a minute.

A solid to liquid phase change is
melting, liquid to gas is evaporation, and sublimation is a
solid to gas phase change.
Dry ice is the best example of sublimation that I can think
of. When placed in a warm room, dry ice turns directly
from solid carbon dioxide to gaseous carbon dioxide without
melting first. If you wash clothes and stick them
outside on a dry cold (below freezing) day they will
eventually dry. The clothes would first freeze but
then the ice would slowly sublime away.
In each case above energy must be added to the material
changing phase. You can consciously add or supply the
energy (such as when you put water in a pan and put the pan
on a hot stove and cause it to boil).
That much is pretty clear. The confusing part of this
topic is when phase changes occur without you playing any
role. Energy is still required to melt ice; in
this case the needed energy will be taken from the
surroundings. It is not always obvious what the
"surroundings" are.
Here is the third thing to
understand, (iii). When energy is
taken from the surroundings, what effect will that have
on the surroundings? When
you take energy from the surroundings, the surroundings will
cool.
Here's an example where you play
the role of the surroundings. You'll be able to feel
what happens when energy is taken from your body and used to
evaporate some water.
When you step out of the shower in the morning you're covered
with water. Some of the water evaporates. It doesn't
ask permission, it just evaporates whether you want it to or
not. The energy needed for evaporation is taken from the
surroundings, from your body. Because your body is losing
energy you feel cold.
The object of this figure is to give you some appreciation
for the amount of energy involved in phase changes. A 240
pound man or woman running at 20 MPH has just enough kinetic
energy (if you could capture it) to be able to melt an ordinary
ice cube (I have been using Tedy Bruschi
as an example for several years but he's now retired so I have
switched to Scooby
Wright). It would take 8 people running at 20 MPH to
evaporate the resulting ice water.
Latent heat energy is energy that is hidden in water or
water vapor. We can now start to
visualize what that means and how that works.

|

|
Energy added to melt the ice is hidden
in the water that results
|
Energy added to evaporate
the water is added to the energy already in the
water and is hidden in the water vapor
|
 |
Phase changes can go in the other direction

Again (i) try to name each phase change and
(ii) show the direction of energy flow (into or out of the
material) when the phase change occurs

You might not have heard of deposition
before when a gas changes directly to a solid. The
formation of frost is an example of deposition.
You can consciously remove energy from water vapor to make it
condense. You take energy out of water to cause it to
freeze (you could put water in a freezer; energy would
flow from the relatively warm water to the colder
surroundings). If one of these phase changes occurs,
without you playing a role, energy will be released into the
surroundings (causing the surroundings to warm).
Note the direction of the energy arrows - energy is being
released into the surroundings (warming the
surroundings). It's kind of like a genie coming out of a
magic lamp. One Scooby Wright worth of kinetic energy is
released when enough water freezes to make an ice cube.
Many Scooby Wrights are released when water vapor condenses.
This release of energy into the surroundings and
the warming of the surroundings is a little harder for us to
appreciate because it never really happens to us in a way that
we can feel. Have you ever stepped out of an air
conditioned building into warm moist air outdoors and had your
glasses or sunglasses "steam up"? Water vapor never
condenses onto your body (your body is too warm).
However if it did you would feel warm. It would be just
the opposite of the cold feeling when you step out of the
shower or a pool and the water on your body evaporates.
You know how cold the evaporation can make you feel, the same
amount of condensation would produce a lot of warming.
I suspect we'd be surprised at how much warming it produces.
Alternate view showing
the latent heat energy in water vapor and water coming
out of hiding during a phase change and being released
into the surroundings.
Here's a practical application of what we have been
learning.
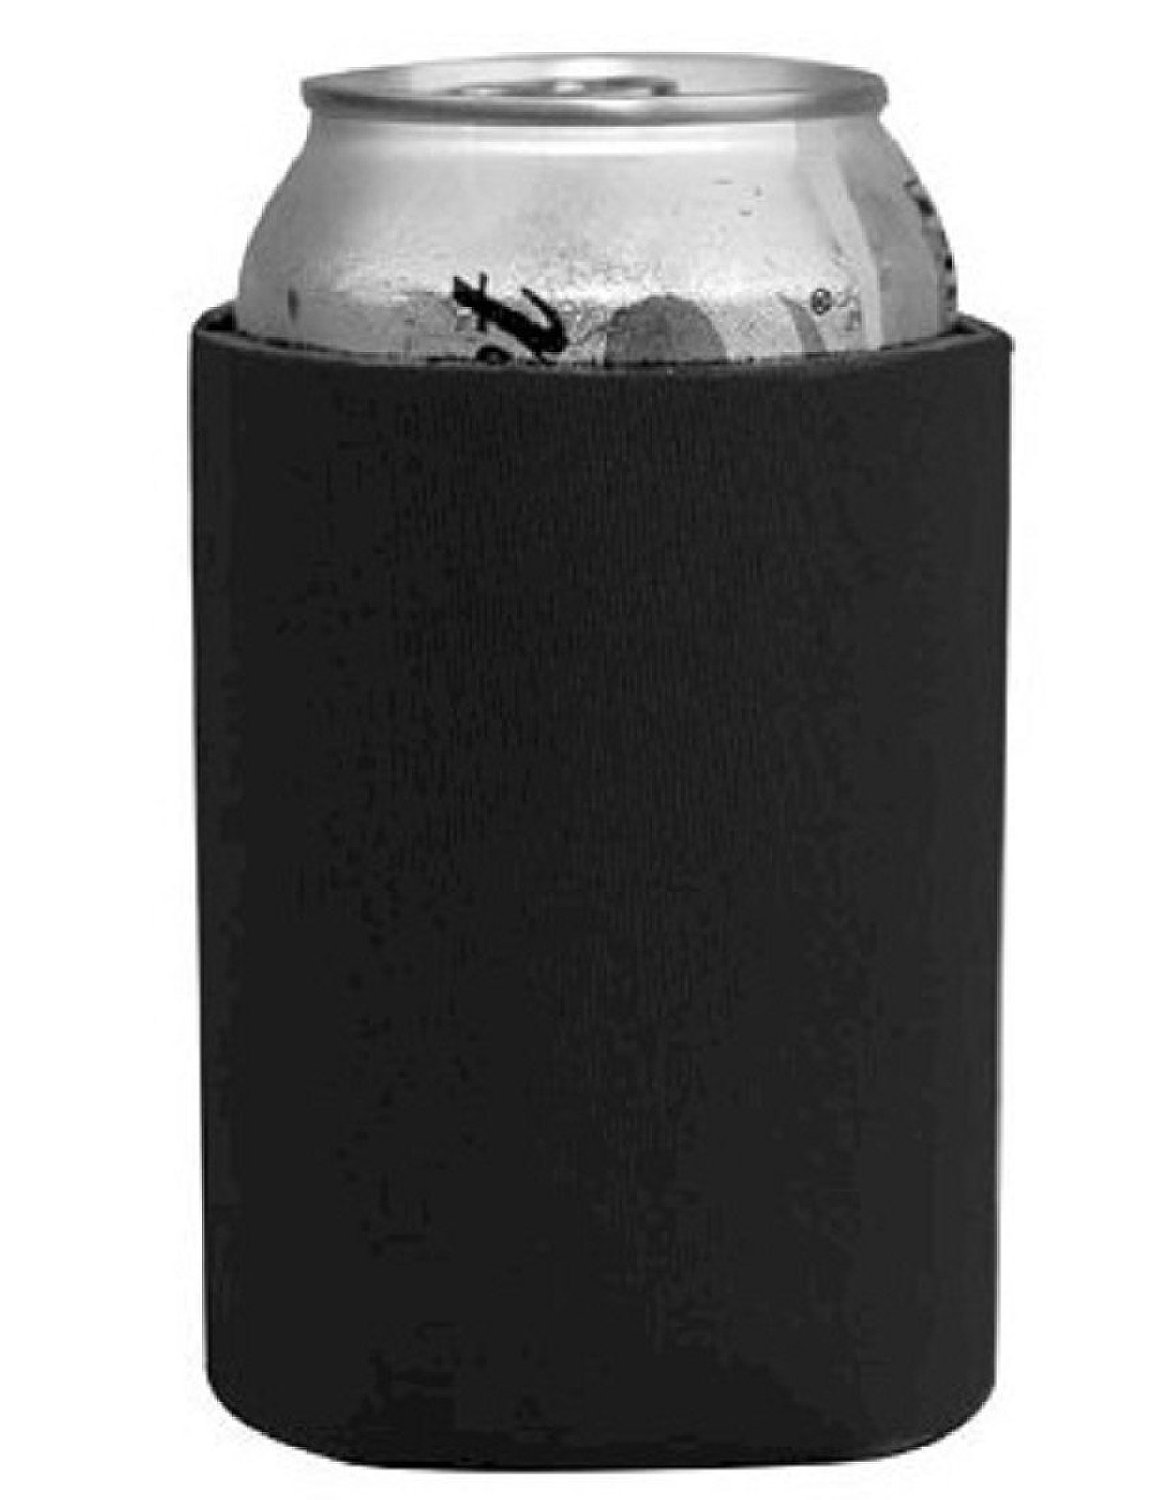
Cans of a cold drink are taken out of the refrigerator and
placed on the kitchen table on a warm dry day and a warm
humid day. Except for the differences in the amount
of moisture in the air everything else is the same.
Moisture has condensed onto the can above at right.
Do the two cans warm up at the same rate or does one warm
up more quickly than the other. In the latter case
which can warms up most rapidly.
The can on the right will warm more quickly. Equal
amounts of heat will flow from the warm air into the cold
cans in both cases. Condensation of water vapor is
an additional source of energy and will warm that can more
rapidly. I suspect that the condensation may
actually be the dominant process.
The foam "cozy", "koozie",
or whatever you want to call it, that you can put around a
can of soda or beer is designed to insulate the can from
the warmer surroundings but also, and probably more
importantly, to keep water vapor in the air from
condensing onto the can (source
of the image above)
We're beating this concept to
death but we're almost done. Two more figures to
illustrate how latent heat energy transport can carry
energy from location to another. This first one is
my favorite, it ties everything together.

1. You've just stepped out of the
shower and are covered with water. The water is
evaporating and energy is being taken from your body.
2. The water vapor (containing the energy taken from
your body), drifts into the kitchen where it finds a cold can
sitting on a table.
3. Water vapor comes into contact with the cold can and
condenses. The hidden latent heat energy in the water
vapor is released into the can and warms the drink
inside.
Without you even
leaving the bathroom,
energy has effectively been transported from your warm
body to the cold can in the kitchen.
Here's what happens on a much grander scale in the
atmosphere.

Energy arriving in sunlight in the tropics has effectively been
transported to the atmosphere in a place like Tucson.
Energy transport by electromagnetic
radiation
It's time to tackle electromagnetic (EM)
radiation, the 4th and most important of the energy transport
processes (it's the most important because it can transport
energy through empty space (outer space)).
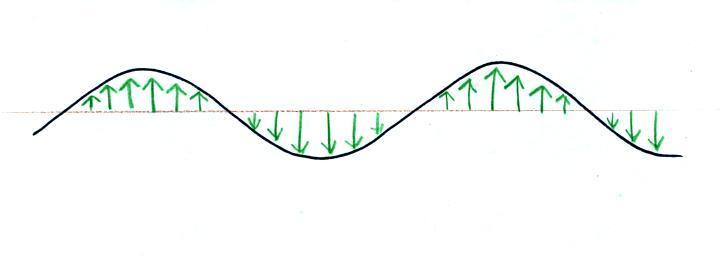
Many introductory textbooks depict EM
radiation with a wavy line like shown above. They don't
usually explain what the wavy line represents.
The wavy line just connects the tips of a bunch of "electric
field arrows". But what exactly are electric field arrows?
An electric
field arrow (vector)
just shows the direction
and
gives you an idea of the strength
of the electrical force
that would be exerted on
a positive charge at
that position.
It's just like an arrow painted on a street showing you what
direction to drive.
Electromagnetic (EM) radiation
Now we'll use what we know about electric field arrows (electric
field for short) to start to understand electromagnetic
radiation. How is it able to carry energy from
one place to another. You'll find most of the following on
p. 60 in the photocopied ClassNotes.
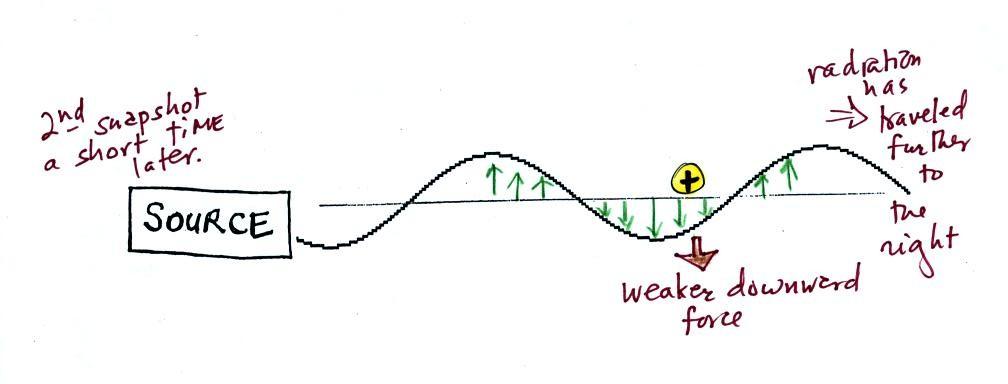
We imagine turning on a source of EM radiation and then a
very short time later we take a snapshot. In that time the
EM radiation has traveled to the right (at the speed of
light). The EM radiation is a wavy pattern of electric and
magnetic field arrows. We'll ignore the
magnetic field arrows. The E field arrows sometimes point
up, sometimes down. The pattern of electric field arrows
repeats itself.
Note the + charge near
the right side of the picture. At the time this picture
was taken the electric field at the position of the + charge points upward.
There is a fairly strong upward pointing force being exerted on
the + charge.
This picture above was taken a short time after the first
snapshot after the radiation had traveled a little further to
the right. The EM radiation now exerts a somewhat weaker
downward force on the +
charge.
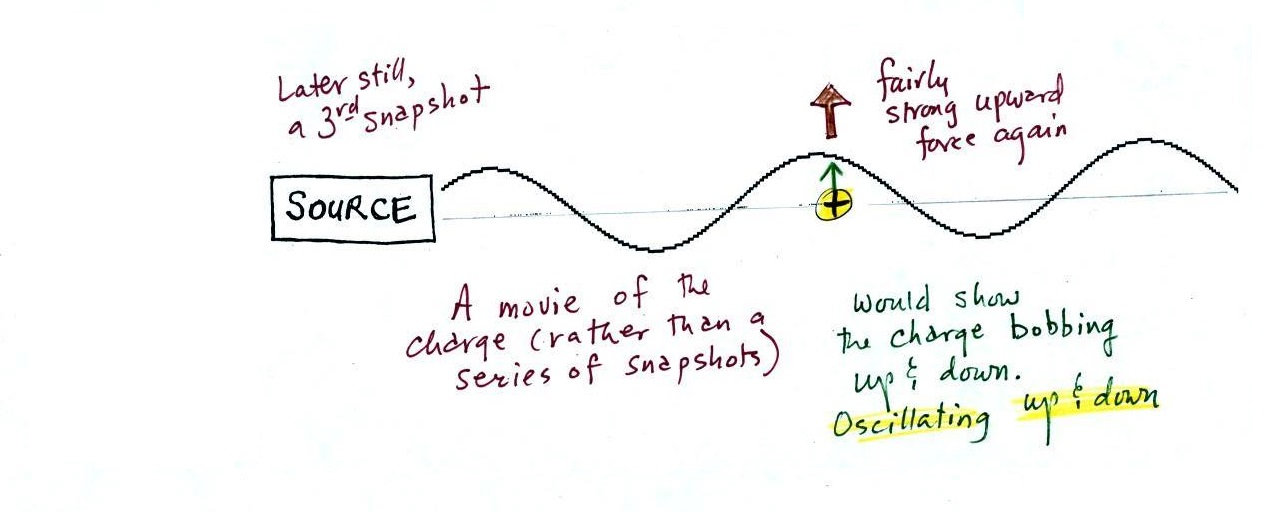
A 3rd snapshot taken a short time later. The + charge is now being pushed
upward again.
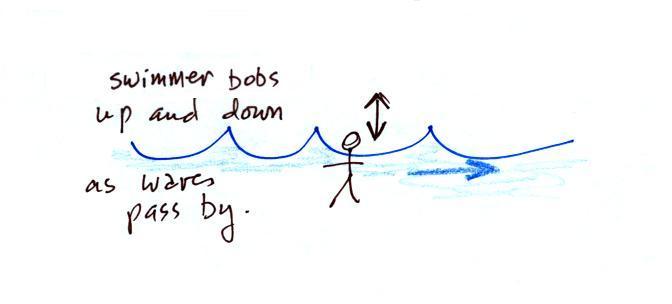
A movie of the + charge,
rather than just a series of snapshots, would show the charge
bobbing up and down much like a swimmer in the ocean would do as
waves passed by.
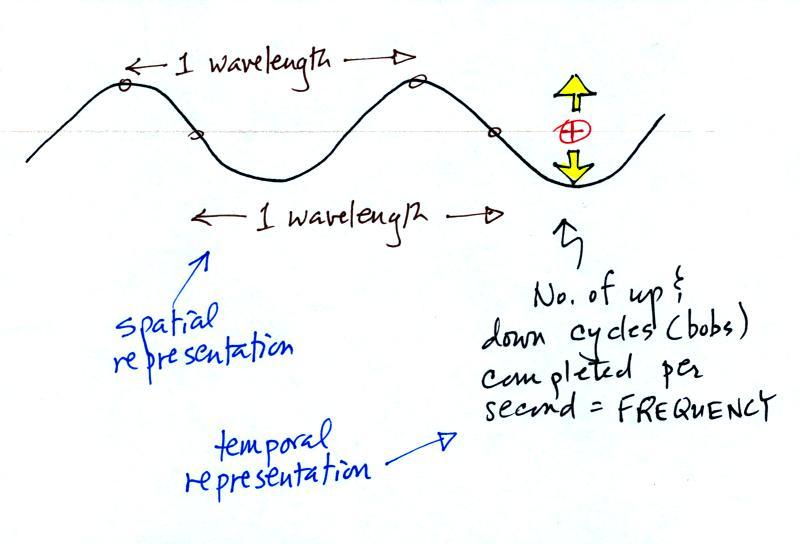
Wavelength and frequency
The wavy pattern used to depict EM radiation can be
described spatially
(what you would see in a snapshot) in terms of its wavelength,
the distance between identical points on the pattern.
Or you can describe the radiation temporally
using the frequency of oscillation (number of up and
down cycles completed by an oscillating charge per
second). By temporally we mean you look at one particular
fixed point and look at how things change with time.
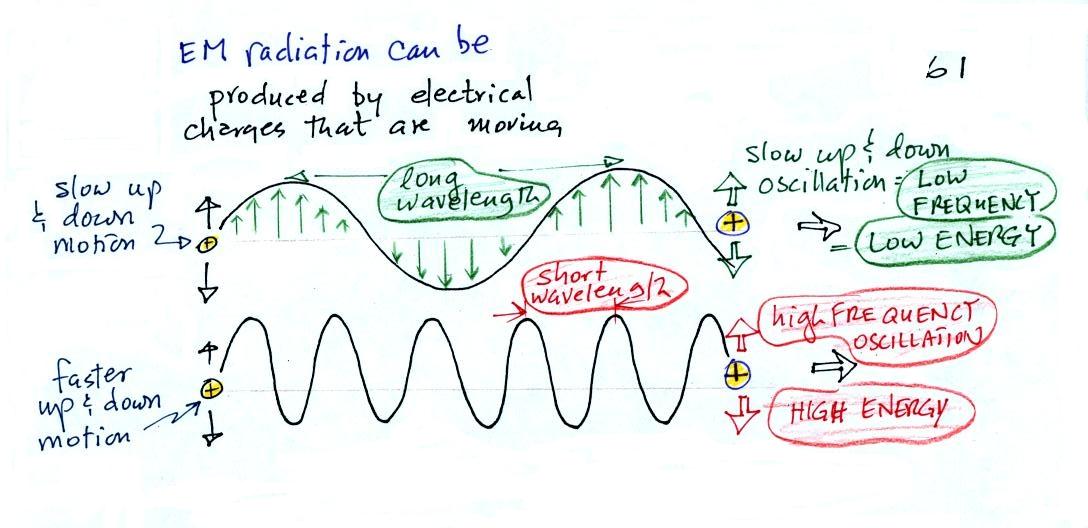
Wavelength, frequency, and energy
EM radiation can be created when you cause a charge to
move up and down. If you move a charge up and down
slowly (upper left in the figure above) you would produce long
wavelength radiation that would propagate out to the right at the
speed of light. If you move the charge up and down more
rapidly you produce short wavelength radiation that propagates at
the same speed.
Once the EM radiation encounters the charges at the right side
of the figure above the EM radiation causes those charges to
oscillate up and down. In the case of the long wavelength
radiation the charge at right oscillates slowly. This is low
frequency and low energy motion. The short wavelength causes
the charge at right to oscillate more rapidly - high frequency and
high energy.
These three characteristics: long
wavelength / low frequency / low energy go
together. So do short wavelength / high
frequency / high energy. Note that the two
different types of radiation both propagate at the same speed.
The
following figure illustrates how energy can be transported
from one place to another (even through empty space) in the
form of electromagnetic (EM) radiation.
You add energy when you cause an
electrical charge to move up and down and create the EM
radiation (top left).
In the middle figure, the EM
radiation that is produced then travels out to the right (it
could be through empty space or through something like the
atmosphere).
Once the EM radiation encounters an electrical charge at
another location (bottom right), the energy reappears as the
radiation causes the charge to move. Energy has been
transported from left to right.
The electromagnetic spectrum
The EM spectrum is just a list of the different kinds of EM
radiation. A partial list is shown below.
In the top list, shortwave wavelength/high energy forms of EM
radiation are on the left (gamma rays and X-rays for
example). Microwaves and radiowaves are longer
wavelength/lower energy forms of EM radiation.
We will mostly be concerned with just ultraviolet light (UV),
visible light (VIS), and infrared light (IR). These are
shown on an expanded scale below. Note the micrometer
(millionths of a meter) units used for wavelength for these kinds
of light. The
visible portion of the spectrum falls between 0.4 and 0.7
micrometers. UV and IR light are both
invisible. All of the vivid colors shown above are just EM
radiation with slightly different wavelengths. When you see
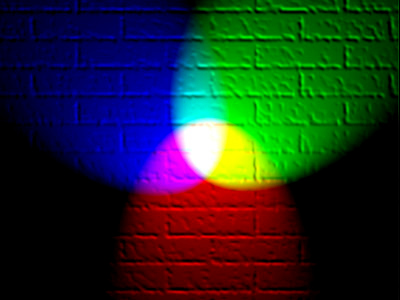
all of these colors mixed together, you see white light.
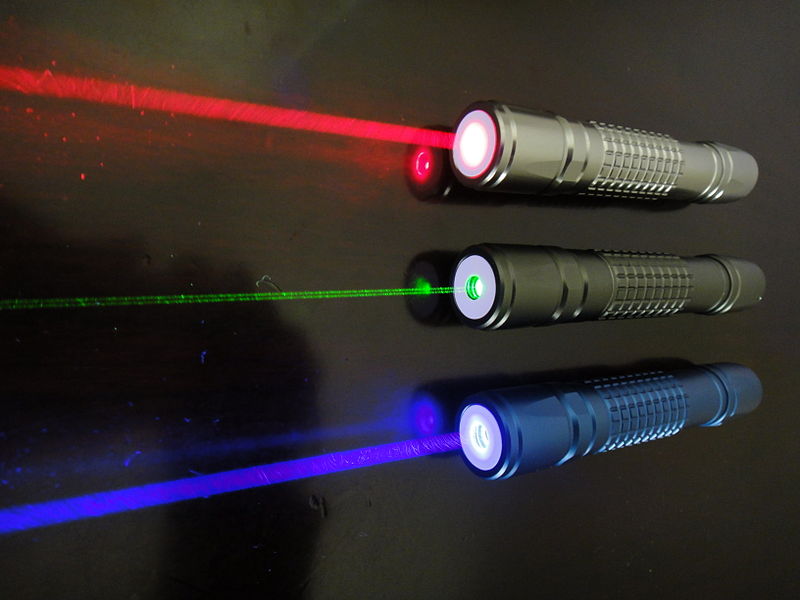
I've tried to demonstrate colors mixing together to make white
light using laser pointers.
But it's too hard to get them adjusted so that the small spots
of colored light all fall on top of each other on the screen at
the front of the room. And even if you do the small spot of
light is so small that it's hard to see clearly in a large
classroom (you need to do the experiment on a piece of paper a few
feet away).
Here's the basic idea, you mix red green and blue light
together. You see white light were the three colors overlap
and mix in the center of the picture above.