Thursday Mar. 27, 2008
Sorry these notes have taken so long to appear,
I have been working on a preliminary version of the Quiz
#3 Study Guide
The revised Expt. #2 reports were due today.
The Experiment #3 reports are due next Tuesday.
Bring in your materials to my office (PAS 588) and pick up the
supplementary
information sheet.
The list that you DO NOT want to find
your name on is working.
Work being returned today:
Monday's in class Optional
Assignment
A new Optional Assignment due at the start of class next Thursday was
handed out.
That makes two optional assignments that are due next week; a controls of temperature
assignment and a humidity
assignment.
One additional handout to check your
understanding of
humidity variables (see below)
Some good & surprising news coming during class today
But it was a close call
Here's
a copy of a handout distributed near the end of
class on Tuesday.
I thought it best not to discuss in class then, that would have been
too much material for one day.
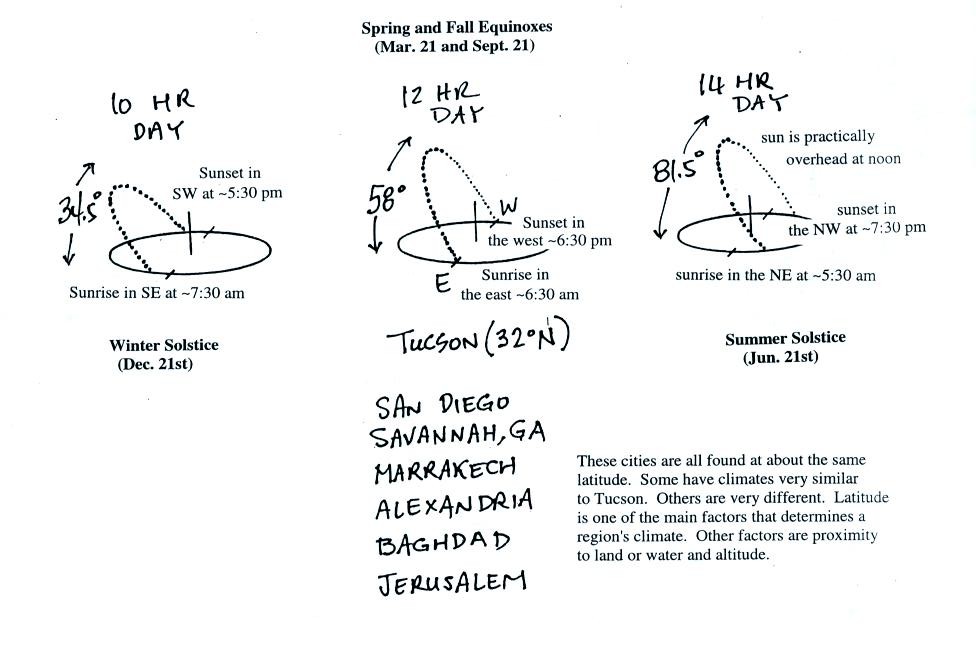
This is the front side of the handout. These are "sunpath
diagrams." The drawings show the
path the sun follows across the sky in Tucson on the winter solstice,
the equinoxes, and the summer solstice.
One of the interesting things that happens on the equinoxes
is
that the
sun rises in the east and sets exactly in the west. This is shown
below.
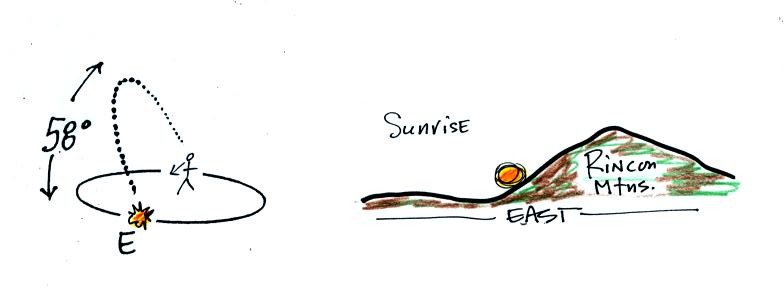
The sun will start of the eastern horizon on the sun path
diagram and then move upward and into the southern sky.

You would need to look south and about 60 degrees above the
horizon to see the sun at noon.
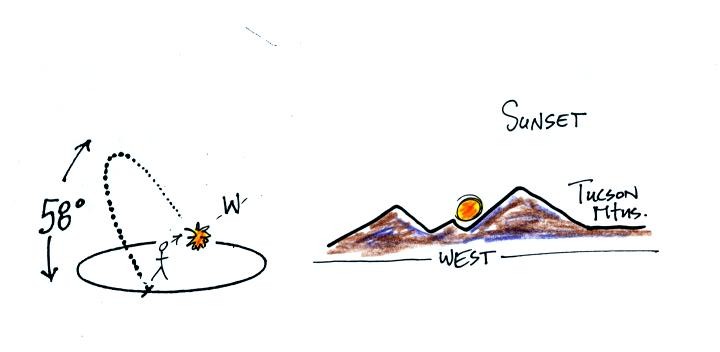
Finally the sun sets exactly in the west.
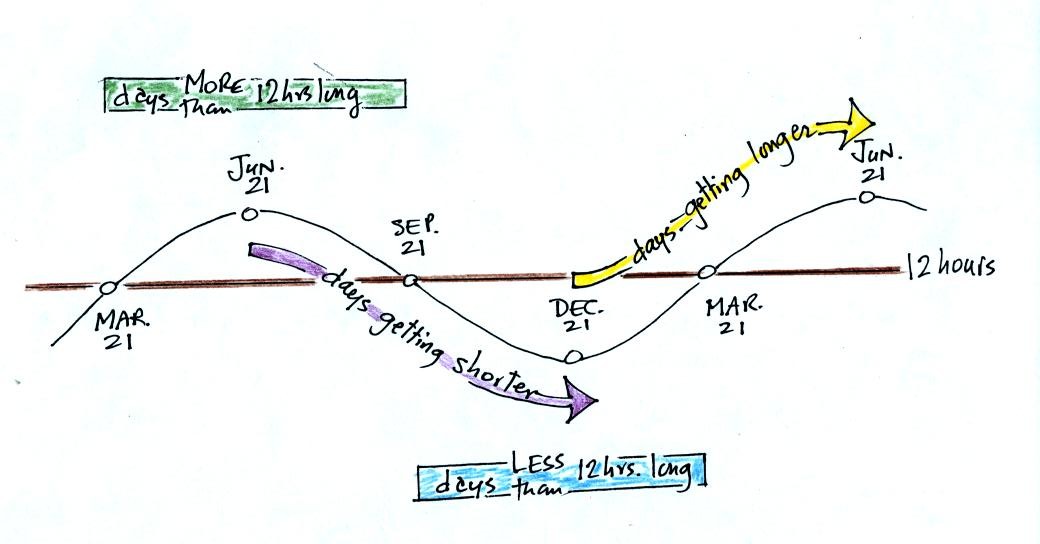
Days increase in length between Dec. 21 and June 21, then
decrease between June 21 and Dec. 21. December 21 is the shortest
day of the year, June 21 is the longest day of the year. Days are
less than 12 hours long between Sept. 21 and Mar. 21 and greater than
12 hours long between Mar 21 and Sept. 21. Days are exactly 12
hours long on the two equinoxes.
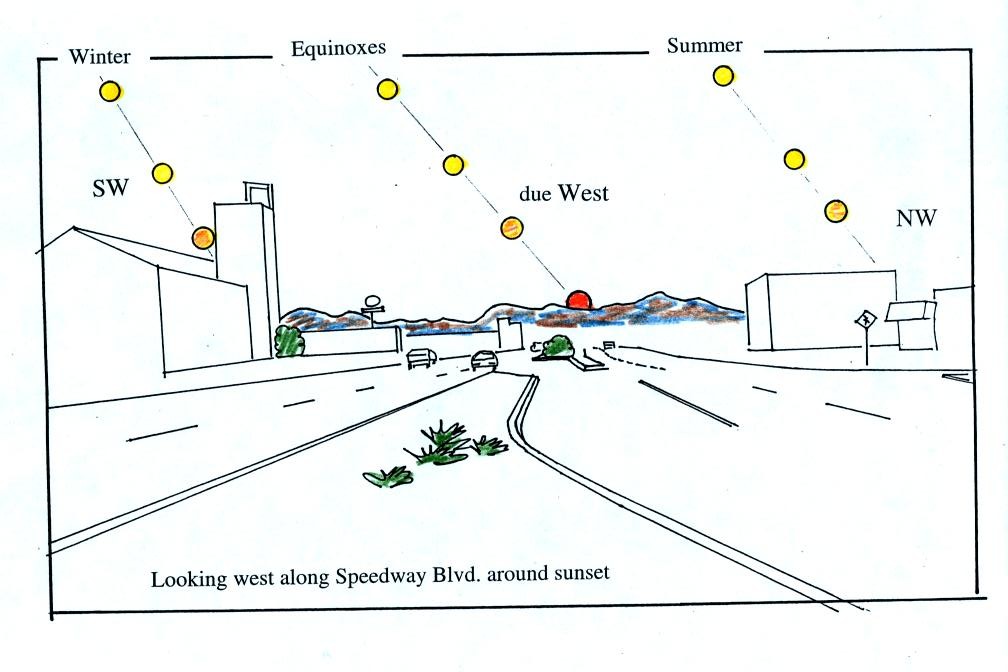
In the summer and winter the sun
sets a little north
and south of west, respectively (the sun sets around 4:30 pm in the
winter and about 7:30 pm in the summer in Tucson).
One fall equinox several years ago I sat out in the median of
Speedway pointed my camera west and took a multiple exposure of the
sunset. The slide was shown in class.
If you are driving west on
Speedway (or another E-W oriented street) at around 6:30 pm on either
the spring or the fall equinox, the sun will be shining directly in
your face. You really need to check this out. The following
article is an example of what can then
happen
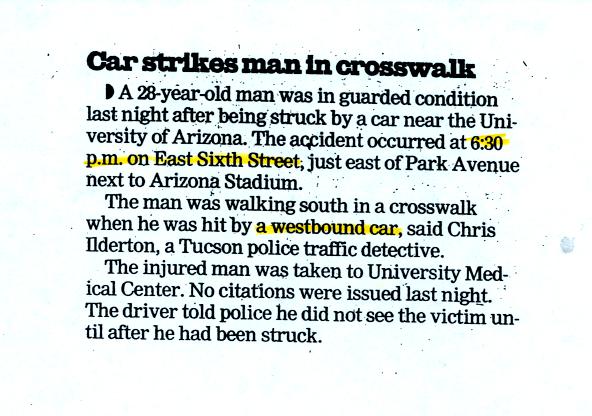
The accident occurred near The University at or near the
equinox
about
the time of sunset. The driver might really not have seen the
pedestrian in the crosswalk. You should be a little more careful
than normal when crossing east-west oriented streets early and late in
the day at this time of year.
Now I can tell you what the good news is.
Do you remember the online notes concerning sunpath diagrams that I might have
told you to fear?
I have decided not to include all of that material on the next
quiz. You will be responsible for just the material on the
handout that we just reviewed.
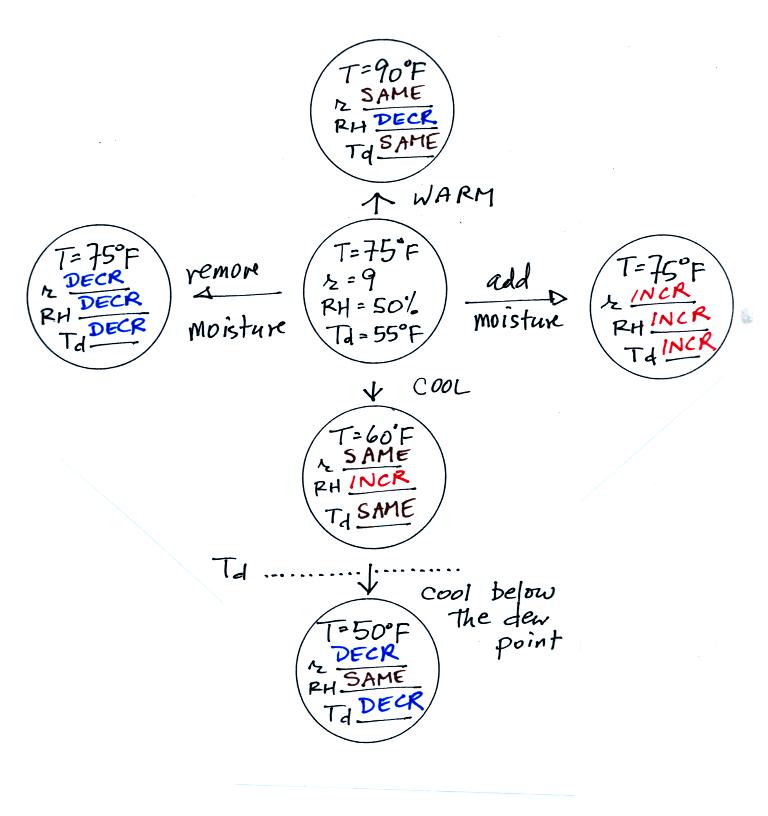
One
Tuesday we worked through a bunch of humidity
example problems. The main reason for doing that was to give you
some feeling for how variables such as mixing ratio, relative humidity,
saturation mixing ratio, and dew point temperature change when you warm
or cool moist air. After you have had a chance to study those
example problems (and you should do that now rather than waiting until
a day or two before the next quiz) you should be able to fill in all
the blanks
on the following take-home, test-yourself worksheet:

You'll find the answers at the end of today's notes.
Next we
will use what we have learned about humidity
variables (what they tell you about the air and what causes them to
change value) to learn some new things.
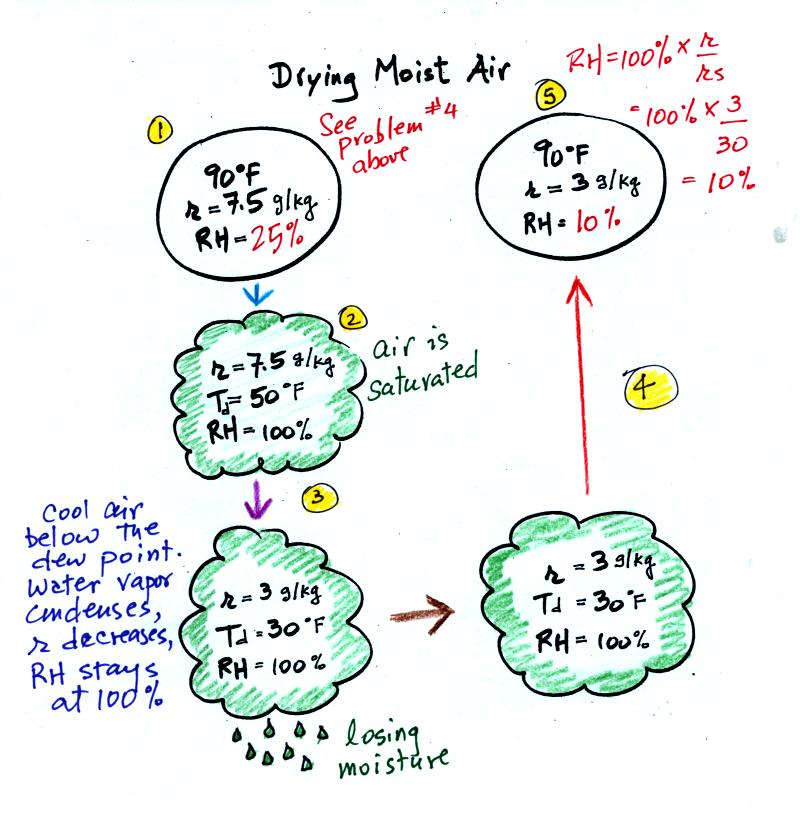
At Point 1 we start with some 90 F air with a relative
humidity of 25%, fairly dry air (these data are the same as in Problem
#4 covered on Tuesday). Point 2 shows the air being cooled to the
dew point, that is
where the relative humidity would reach 100% and a cloud would form.
Then the air is cooled below the dew
point, to
30 F. Point 3 shows the 30 F air can't hold the 7.5 g/kg of water
vapor that
was originally found in the air. The excess moisture must
condense (we will assume it falls out of the air as rain or
snow). When air reaches 30 F it contains less than half the
moisture (3 g/kg) that it originally did (7.5 g/kg). Next, Point
4, the 30
F air is warmed back to 90 F, the starting temperature, Point 5.
The air
now
has a RH of only 10%.
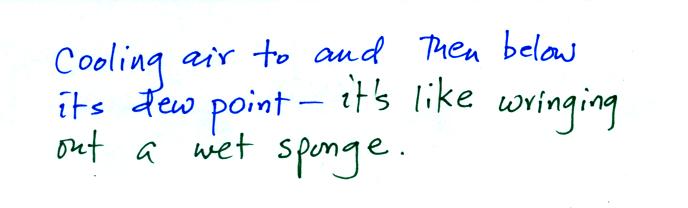
Cooling moist below its dew point, drying moist moist, air is like
wringing moisture from a wet sponge.
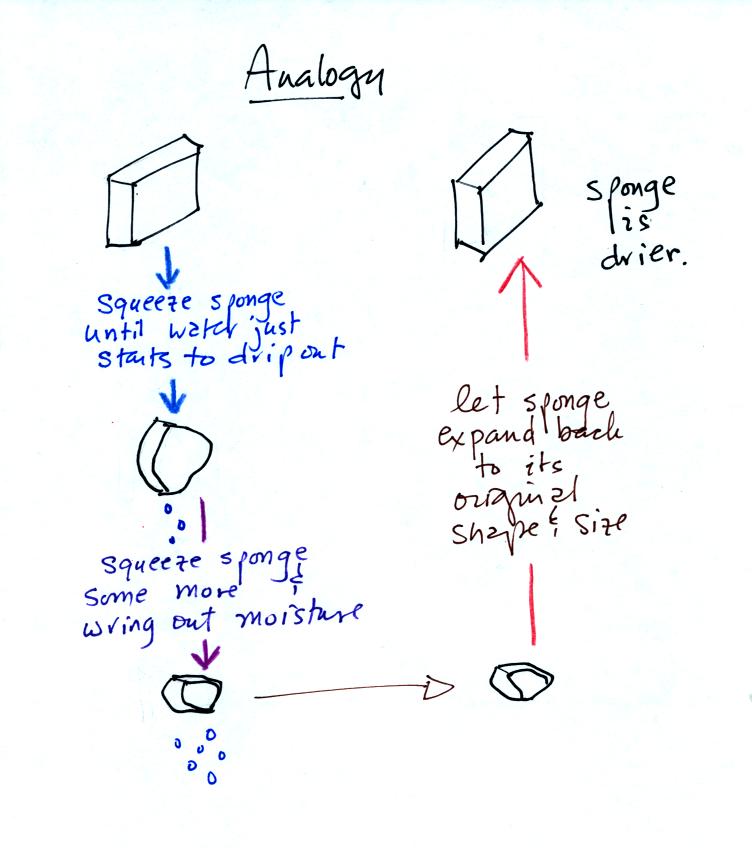
You start to
squeeze the sponge and nothing happens at first (that's like cooling
the air, the mixing ratio stays constant as long as the air doesn't
lose any water vapor). Eventually water will start to drop from
the sponge (with air this is what happens when you reach the dew point
and continue to cool the air below the dew point). Then you let
go of the sponge and let it expand back
to its orignal shape and size (the air warms back to its original
temperature). The sponge (and the air) will be drier than when
you started.
This sort of process ("squeezing" water vapor out of moist air by
cooling the air below its dew point) happens all the time. Here
are a couple of examples.

In the
winter cold air is brought inside your house or apartment and
warmed. Imagine 30 F air with a RH of 100% (this is a best case
scenario, the cold winter air usually has a lower dew point and is
drier). Bringing the air inside and warming it will cause the RH to
drop from 100% to 20%.. Air indoors during the winter is often
very dry.
The air in an
airplane comes from outside the plane. The air outside the plane
can be very cold (-60 F perhaps) and contains very little water
vapor (even if the -60 F air is saturated it would contain essentially
no water vapor). When brought inside and warmed to a
comfortable
temperature, the RH of the air in the plane will be very close
0%.
Passengers often complain of becoming dehydrated on long airplane
flights. The plane's ventilation system probably adds moisture to
the
air so that it doesn't get that dry.
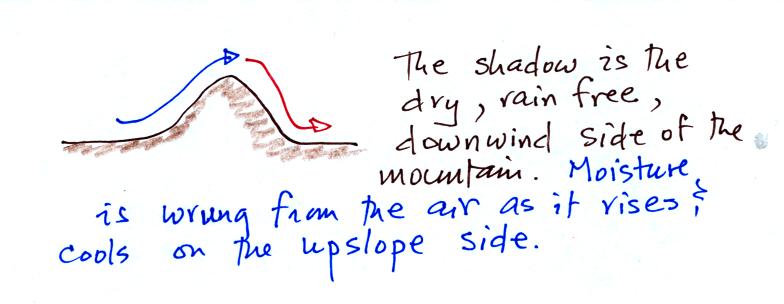
Here's a very important example, the rain shadow effect (the figure was
redrawn after class for clarity).
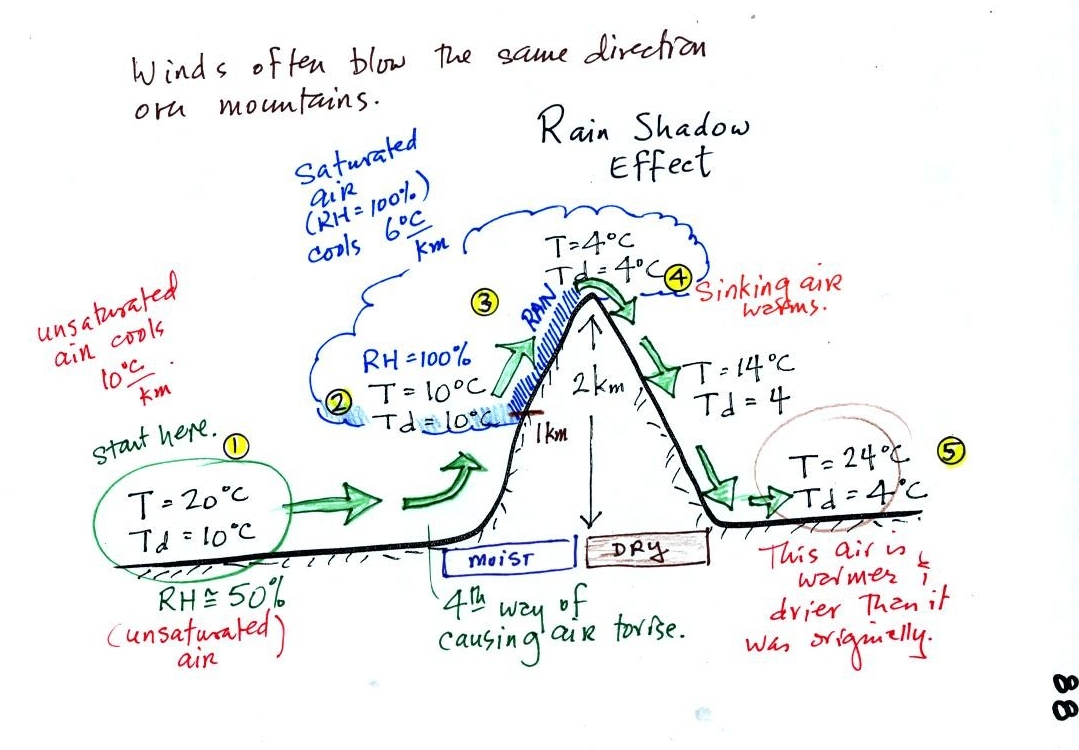
We start with some moist but unsaturated air (RH is about
50%) at Point
1.
As it is moving toward the right the air runs into a mountain and
starts to rise (see the note below). Unsaturated air
cools 10 C for every kilometer of altitude gain.
This is known as the dry adiabatic lapse rate. So in rising 1 km
the air will cool to 10 C which is the dew point.
The air becomes saturated at Point 2, you would see a cloud
appear. Rising saturated air cools at a slower rate than
unsaturated air. We'll use a value of 6 C/km (an average
value). The air cools from 10 C to 4
C in next kilometer up to the top of the mountain. Because the
air is being cooled below its dew point at Point 3, some of the water
vapor will condense and fall to the ground as rain.
At Point 4 the air starts back down the right side of the
mountain. Sinking air is compressed and warms. As soon as
the air starts to
sink and warm, the relative humidity drops below 100% and the cloud
evaporates. The sinking air will warm at the 10 C/km rate.
At Point 5 the air ends up warmer (24 C vs 20 C) and drier (Td =
4 C vs Td = 10 C) than when it started out. The downwind side of
the mountain is referred to as a "rain shadow" because rain is less
likely there than on the upwind side of the mountain. Rain is
less likely because the air is sinking and because the air on the
downwind side is drier than it was on the upslope side.
Most of the year the air that arrives in Arizona comes from the Pacific
Ocean. It
usually isn't very moist by the time it reaches Arizona because it has
travelled up and over the
Sierra Nevada mountains in
California and the Sierra Madre mountains further south in
Mexico. The air loses much of its moisture on the western slopes
of those mountains.
NOTE: The figure
above illustrates orographic or topographic lifting.
It is one of 4
ways of causing air to rise. We have already run into the other
three in class this semester. They were: convergence
(surface winds spiral into centers of low pressure), convection (warm
air rises), and fronts. Rising air is important because rising
air expands and cools. Cooling moist air raises the relative
humidity and a cloud might form.
Finally we
learned about a simple instrument used to measure humidity, a sling
psychrometer.
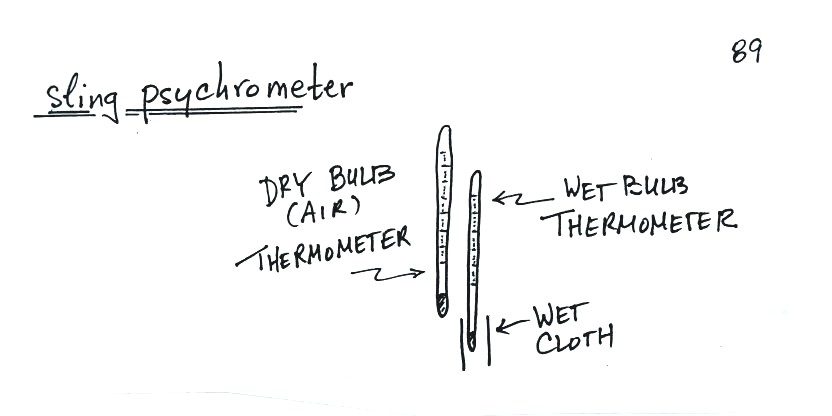
A sling
psychrometer consists of two thermometers mounted
side by side. One is an ordinary thermometer, the other is
covered with a wet piece of cloth. To
make a humidity measurement you swing the psychrometer around for a
minute or two and then read the temperatures from the two
thermometers. The dry - wet thermometer (dry and wet bulb)
temperature difference can be
used to determine relative humidity and dew point (see Appendix D at
the back of the textbook).
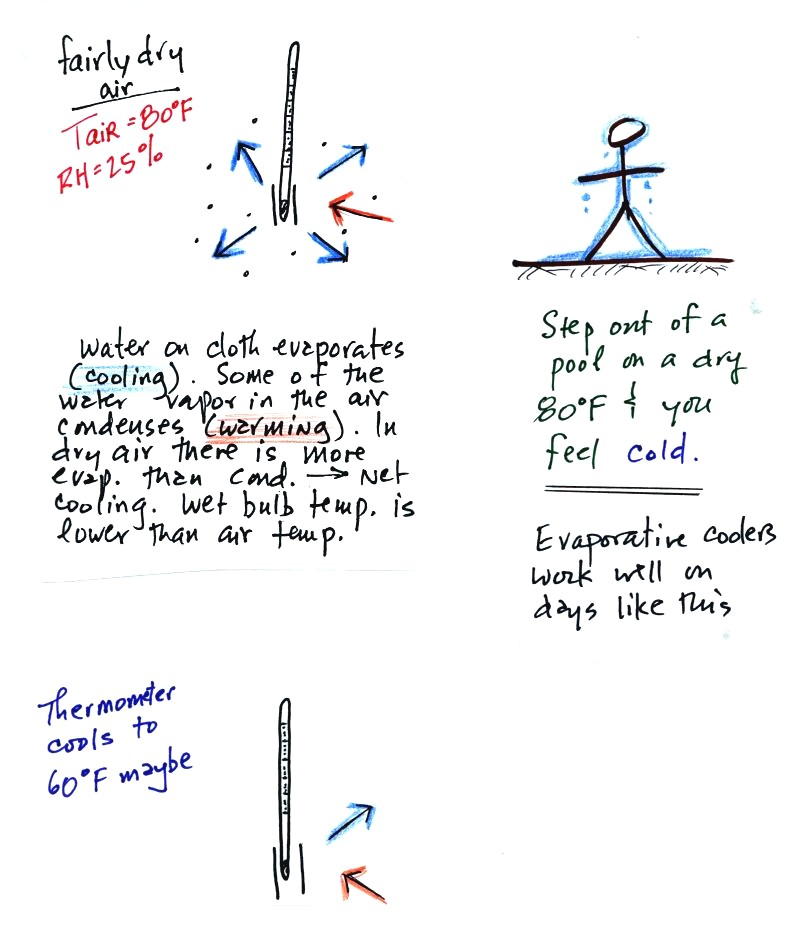
The figure at upper left shows what
will happen as you start to swing the wet bulb thermometer. Water
will begin to evaporate from the wet piece of cloth. The amount
or rate of evaporation will depend on the water temperature (the
80 F
value was just made up in this example). Warm water evaporates at
a higher rate than cool water. If you haven't already done so
(which I'm guessing you haven't) you might have a look at the online
notes concerning water
vapor saturation.
The evaporation is shown as blue arrows because this will cool the
thermometer. The same thing would happen if you were to step out
of a swimming pool on a warm dry day, you would feel cold. Swamp
coolers would work well on a day like this.
The figure at upper left also shows one arrow of condensation.
The amount or rate of condensation
depends on how much water vapor is
in the air surrounding the thermometer. In this case (low
relative humidity) there isn't much water vapor. The
condensation arrow is orange because the condensation will release
latent heat and warm the thermometer.
Because there is more evaporation (4 arrows) than condensation (1
arrow) the wet bulb thermometer will drop.
Note in the bottom left figure we imagine that the wet bulb thermometer
has cooled to 60 F. Because the wet piece of cloth is cooler,
there is less evaporation. The wet bulb thermometer has cooled to
a temperature where the evaporation and condensation are in
balance. The thermometer won't cool any further.
You
would measure a large difference (20 F) between the dry and wet bulb
thermometers on a day like this when the air is relatively dry.
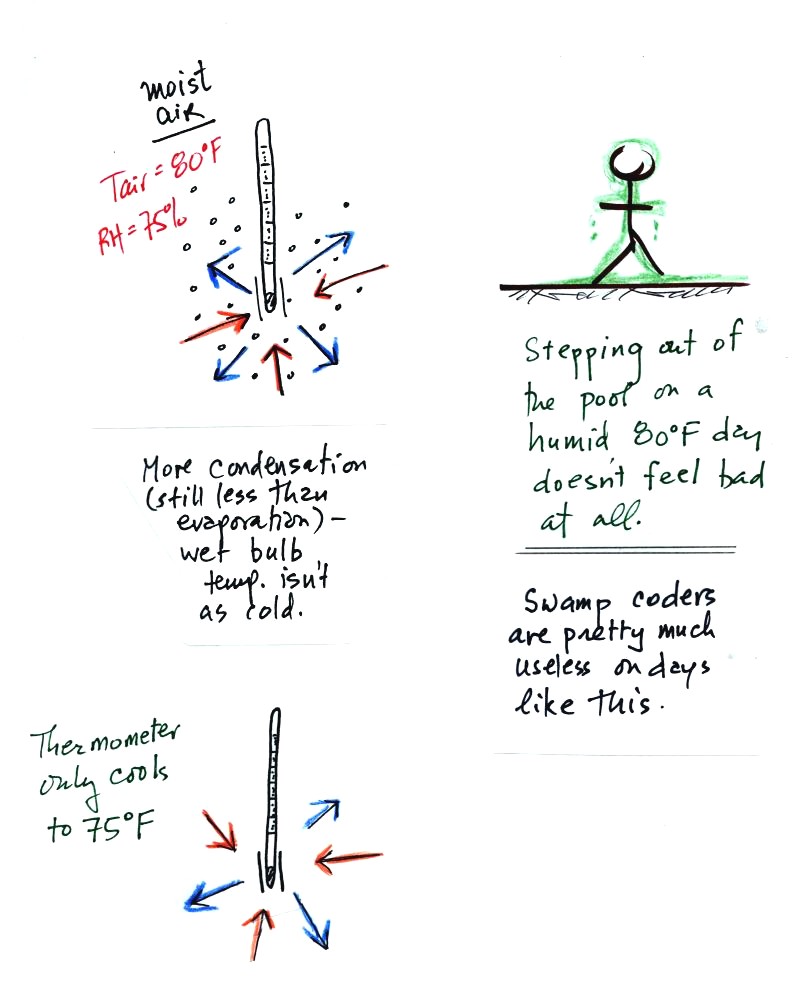
The air temperature is the same in this
example, but there is more
water vapor in the air.
You wouldn't feel as cold if you stepped out of a pool on a warm humid
day like this. Swamp coolers wouldn't provide much cooling on a
day like this.
There are four arrows of evaporation (because the water temperature is
still 80 F just as it was in the previous example) and three arrows now
of
condensation (due to the increased amount of water vapor in the air
surrounding the thermometer). The wet bulb thermometer will cool
but won't get as
cold as in the previous example.
The wet bulb thermometer might well only cool to 75 F. This might
be enough to lower the rate of evaporation (from 4 arrows to 3 arrows)
enough to bring it into
balance with the rate of condensation.
You would measure a small difference (5 F) between the dry and wet bulb
thermometers on a humid day like this.
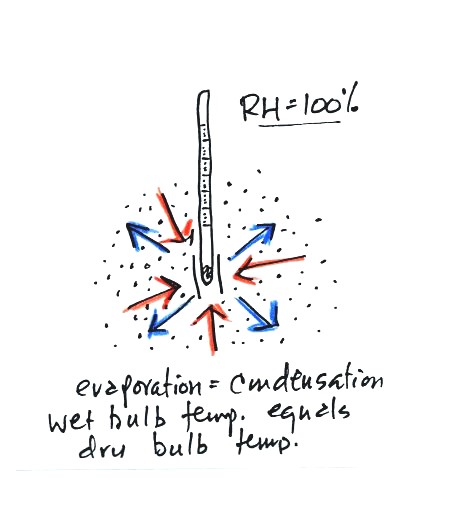
There won't be any difference in
the dry and wet bulb temperatures when
the
RH=100%. The rates at which water is evaporating and water vapor
is condensing are equal. The dry and wet bulb thermometers would
both read 80 F.
The
next 1S1P assignment will probably be made next week. You will
again be able to choose from 2 or 3 (or more) topics and will have a
couple of weeks to write your report.
If there is a particular topic that you would like to see included in
the next 1S1P assignment please let me know.
Next we'll
be covering several of the phenomena shown below.

It turns out that it is much easier for water vapor to condense
onto
something rather than just forming a small droplet of pure
water (you'll find some discussion of this on p. 92 in the photocopied
Class Notes, that's optional reading). Near the ground water
vapor will condense onto cold
objects on the ground (the grass, automobile, and newspaper
above). In air above the ground water vapor condenses onto small
particles in the air called condensation nuclei.
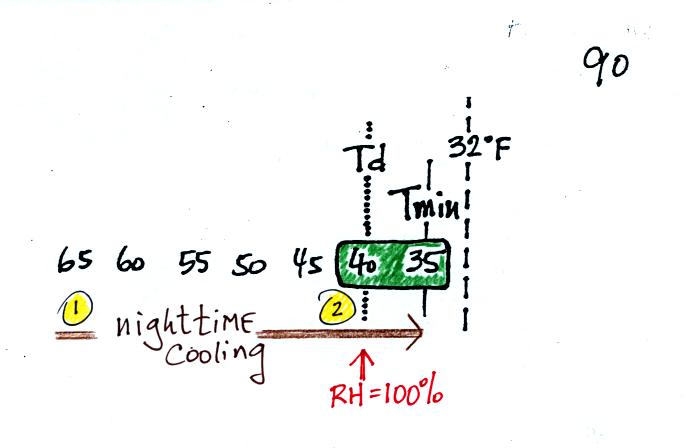
It might be a little hard to figure out what is being illustrated
here. Point 1 is sometime in the early evening when the
temperature of the air at ground level is 65. By the next morning
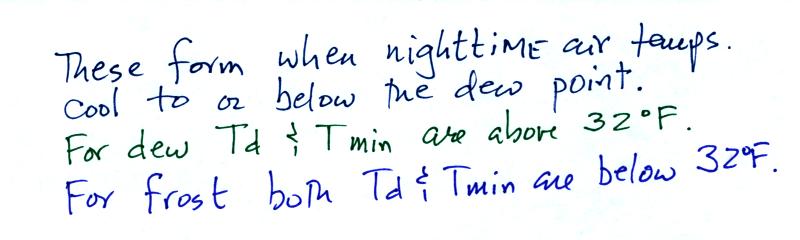
the air has cooled to 35 F. When the air temperature reaches 40
F, the dew point, the relative humidity reaches 100% and water vapor
begins to condense onto the ground. You would find your newspaper
and your covered with dew the next morning.
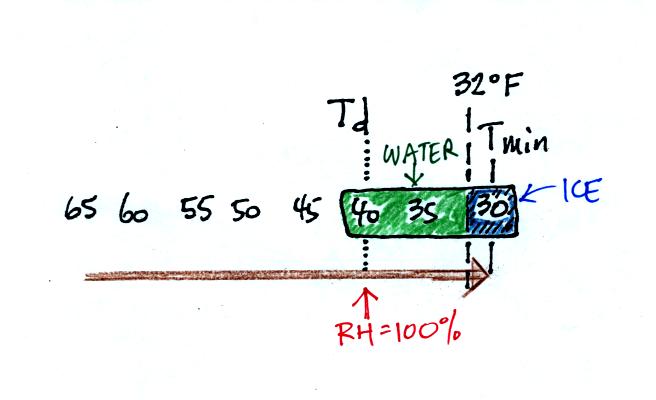
The next night is similar except that the nighttime minimum
temperature drops below freezing. The dew that covers everything
on the ground freezes and turns to ice. This isn't frost, rather
frozen dew. Because quite a bit of water vapor condensed and then
froze, the layer of ice on your automobile windshield can be thick and
difficult to scrape off.
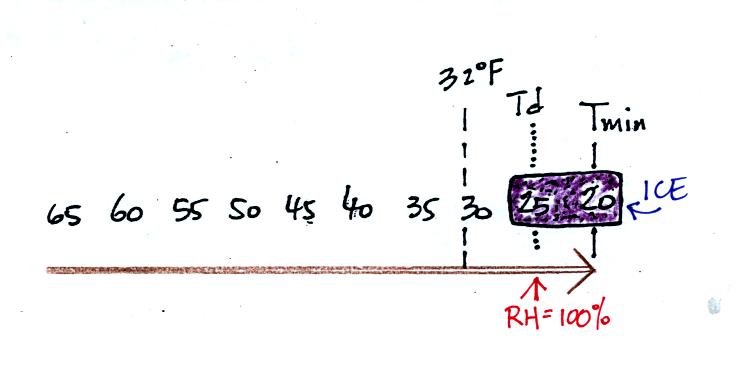
For frost to form, the dew point and the minimum temperature must both
below freezing. When the RH reaches 100% the water vapor turns
directly to ice (deposition).
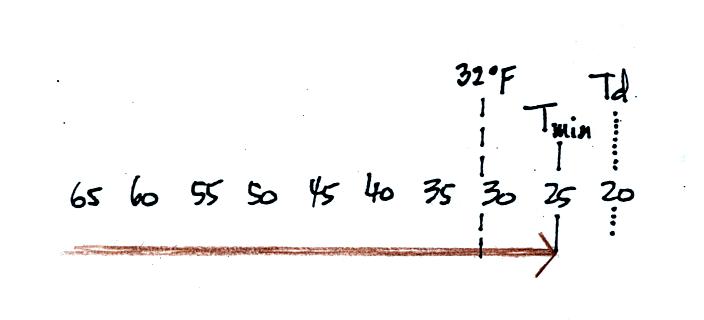
The dew point is often so low that the air never reaches the dew point
during the night. The relative humidity never reaches 100%.
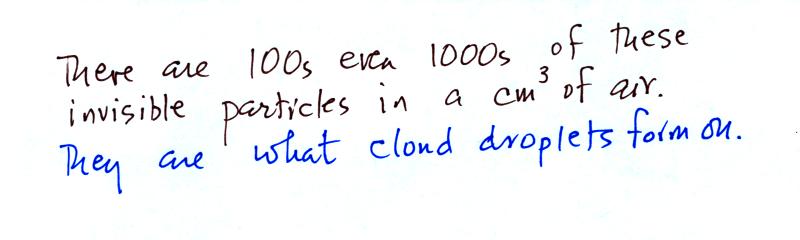
When air
above the ground reaches 100% relative humidity it is much easier for
water vapor to condense onto small particles in the air called
condensation nuclei than to just form a small droplet of water.
There are hundreds even thousands of these small particles in every
cubic centimeter of air. We can't see them because they are so
small.
You can learn why it is so hard to form small droplets of pure water by
reading the top of p. 92 in the
photocopied class notes.
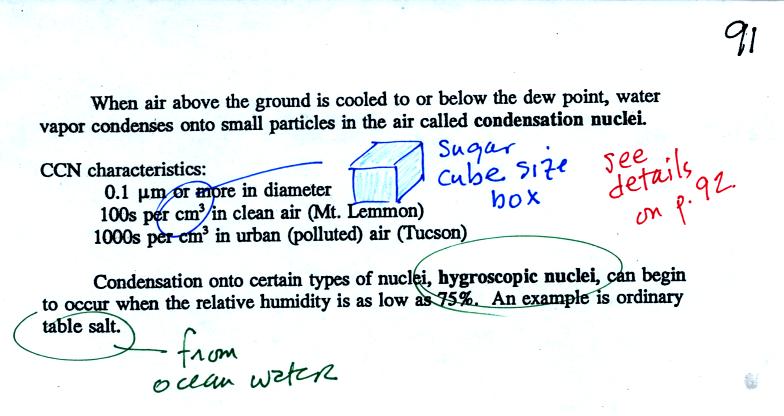
Water vapor will condense onto certain kinds of condensation
nuclei
even when the relative humidity is below 100% (again you will find some
explanation of this on the bottom of
p.
92). These are called hygroscopic
nuclei.
A short video showed how water vapor would, over time,
preferentially
condense onto small grains of salt rather than small spheres of glass.
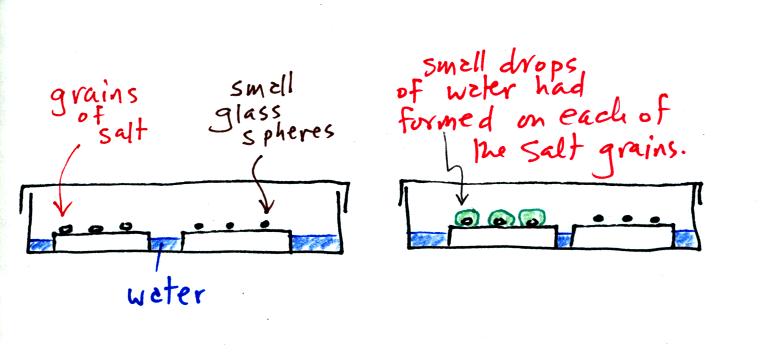
The start of the video at left showed the small grains of
salt were
placed on a platform in a petri dish
containing water. Some small spheres of glass were placed in the
same
dish. After about 1 hour small drops of water had formed around
each
of the grains of salt (shown above at right). The figure above wasn't shown in class.
In humid parts of the US, water will condense onto the grains of salt
in a salt shaker causing them to stick together. Grains of rice
apparently will keep this from happening and allow the salt to flow
freely out of the shaker when needed.
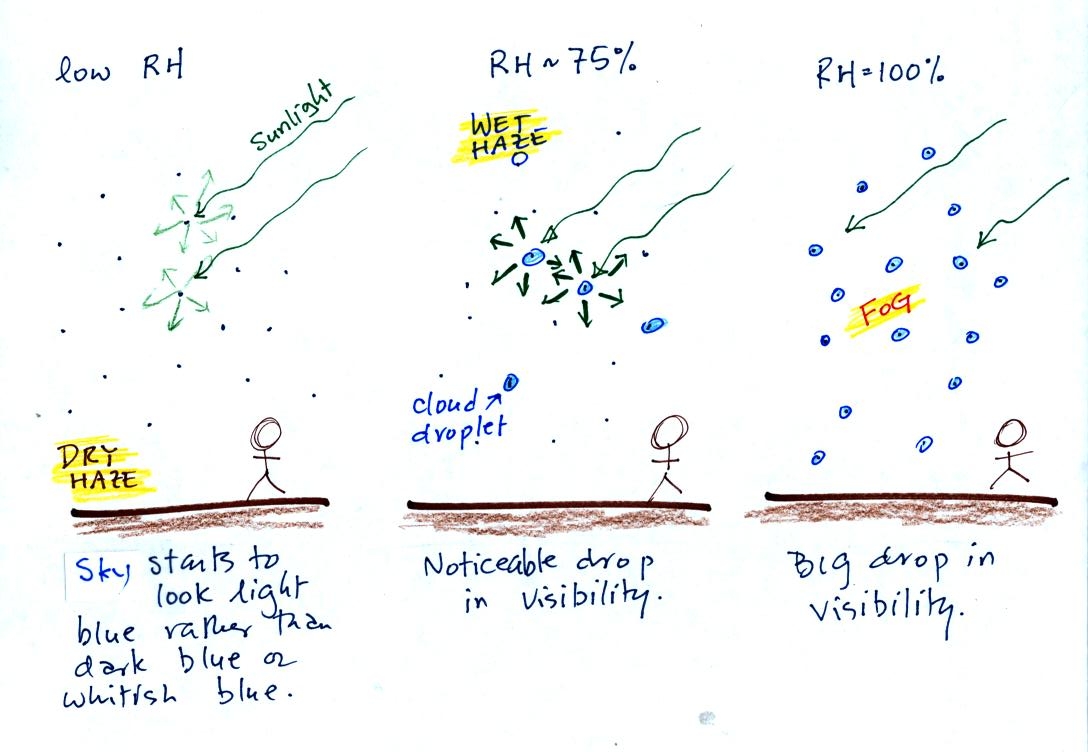
This figure (redrawn after class for improved clarity) shows
how
cloud
condensation nuclei and increasing relative humidity can affect the
appearance of the sky and the visibility.
The air in the left most figure is relatively dry. Even though
the condensation nuclei particles are too small to be seen with the
human eye you can tell they are there because they scatter
sunlight. When you look at the sky you see the deep blue color
caused by scattering of sunlight by air molecules mixed together with
some white
light scattered by the condensation nuclei. This changes
the color of the sky from a deep blue to a bluish white
color. The more particles there are the whiter the sky
becomes. This is called "dry haze."
The middle picture shows what happens when you drive from the dry
southwestern part of the US into the humid
southeastern US. One of the first things you would notice is the
hazier
appearance of the air and a decrease in visibility. Because the
relative humidity is high,
water vapor begins to condense onto some of the condensation nuclei
particles (the hygroscopic nuclei) in the air and forms small water
droplets. The water droplets scatter more sunlight than just
small particles alone. The increase in the amount of scattered
light is what gives the air its hazier appearance. This is called "wet
haze."
Finally when the relative humidity increases to 100% fog forms.
Fog can cause a severe drop in the visibility. The thickest fog
forms in dirty air that contains lots of condensation nuclei. We
will see this effect in the cloud-in-a-bottle demonstration coming up
next.
Cooling
air and
changing relative humidity, condensation nuclei, and scattering of
light are all involved in this demonstration.
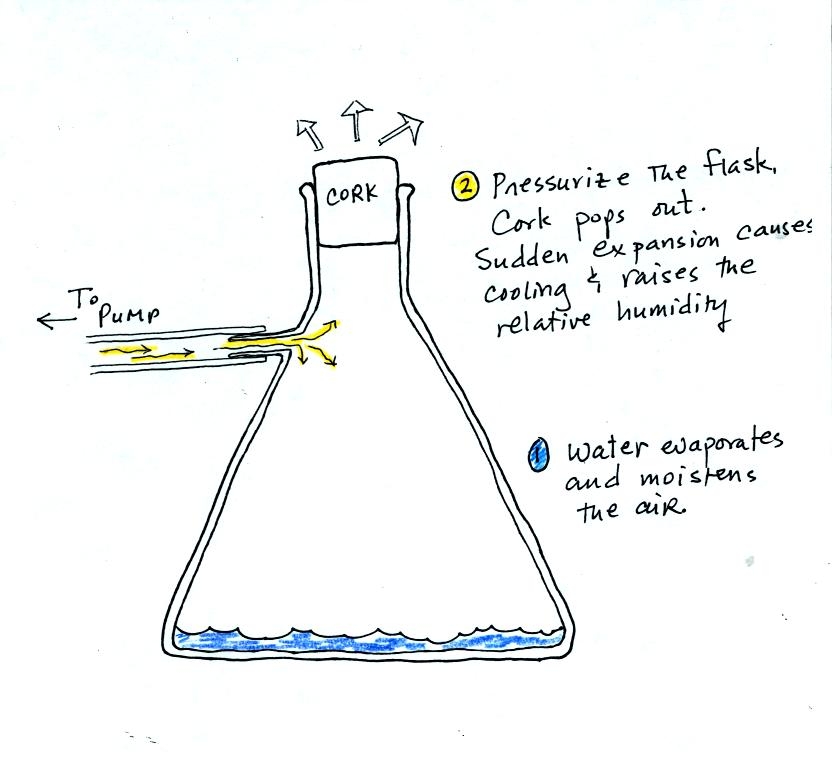
We used a strong thick-walled 4 liter flask (flasks
like this are designed not to implode when all of the air is pumped out
of them, they aren't designed not explode when pressurized).
There
was a little
water in the bottom of the flask to moisten the air in the flask.
Next we pressurized the air in the flask. At some point the
pressure blows the cork out of the top of the flask (hopefully).
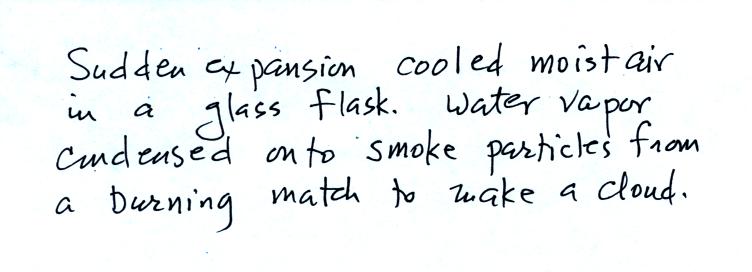
The air in
the flask expands outward and cools. This sudden cooling
increases the
relative humidity of the moist air in the flask to 100% (probably more
than 100%) and water vapor condenses onto cloud condensation nuclei in
the air. A cloud became visible at this point. The
cloud droplets are too small to be seen with the human eye. You
can see the cloud because the water droplets scatter light.
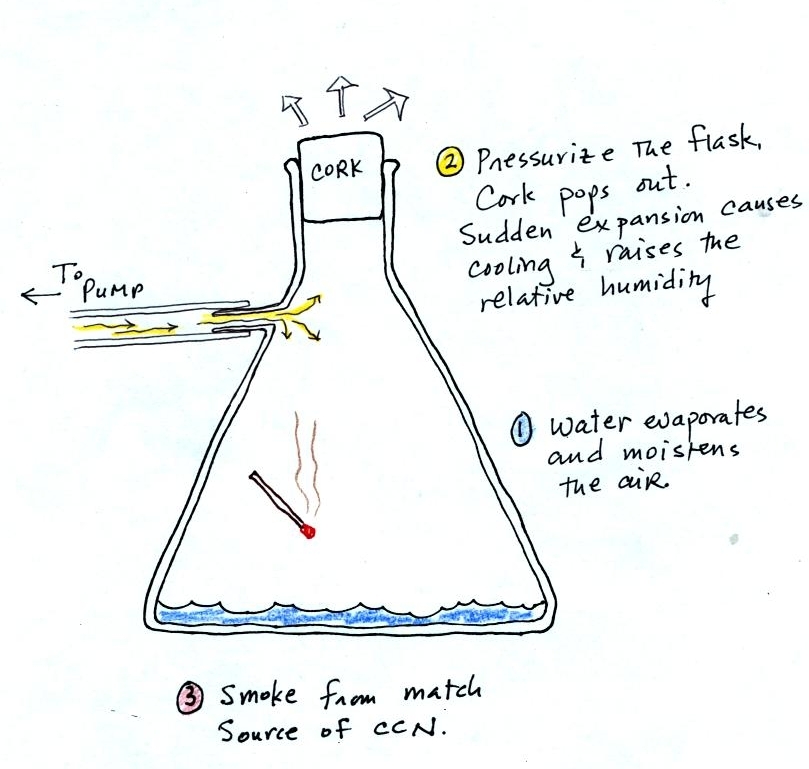
The demonstration was repeated an additional time with one
small
change. A burning match was dropped into the
bottle. The smoke from the match added lots of very small
particles, condensation nuclei, to the air in the flask. The
cloud that formed
this time was somewhat "thicker" and easier to see.
The next
two figures weren't shown in class.
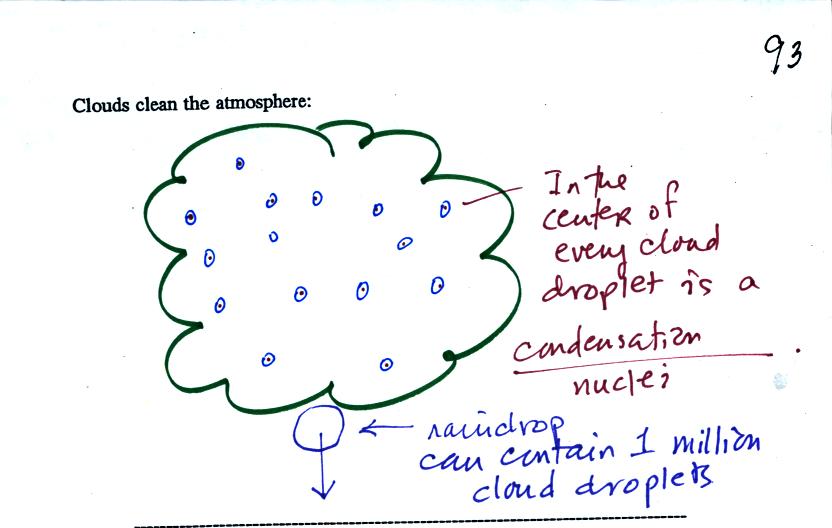
Clouds are one of the best ways of cleaning the
atmosphere
(cloud
droplets form on particles, the droplets clump together to form a
raindrop, and the raindrop carries the particles to the ground).
A raindrop can contain 1 million cloud droplets so a single raindrop
can remove a lot of particles from the air. You may have noticed
how clear the air seems the day after a rainstorm. Gaseous
pollutants can dissolve in the water droplets and be carried to
the ground by rainfall also.

A cloud that forms in dirty air is composed of a large
number of small droplets (right figure above). This cloud is more
reflective
than a cloud that forms in clean air, that is composed of a smaller
number of larger
droplets (left figure).
This is has implications for climate change.
Combustion of fossil fuels adds carbon dioxide to the atmosphere.
There is concern that increasing carbon dioxide concentrations will
enhance the greenhouse effect and cause global warming.
Combustion also adds condensation nuclei to the atmosphere (just like
the burning match added smoke to the air in the flask). More
condensation nuclei might make it easier for clouds to form, might make
the clouds more reflective, and might cause cooling. There is
still quite a bit of uncertainty how clouds might change and how this
might affect climate (remember too that clouds are good absorbers of IR
radiation).
Here are the answers to the
take-home test-yourself
handout from earlier in the day.
There was
one last activity that I suggested you try. In just a sentence or
two try to say something about each of the following topics that were
covered during class today.
1. Drying moist air
rain shadow effect
2. Sling Psychrometer

3. dew, frost
4. cloud condensation nuclei
5. cloud-in-a-bottle demonstration