Monday Oct. 22, 2007
Optional Assignment #5 (Humidity) was collected today. Answers to
this assignment will be distributed in class on Wednesday. Answers to Optional Assignment #4
(Controls of Temperature) are available online.
The 1S1P Assignment #2 reports are due on
Wednesday.
The Experiment #3 reports are due next
Monday. You should collect your data this week (warm sunny
weather is predicted starting Tuesday). Return the materials this
week and pick up the supplementary information sheet.
The beginning of the Quiz #3 Study
Guide is now online.
It is not too early to beginning reviewing the material on humidity.
Class
started with a cloud in a bottle demonstration. Cooling air and
changing relative humidity, condensation nuclei, and scattering of
light are all involved in this demonstration.
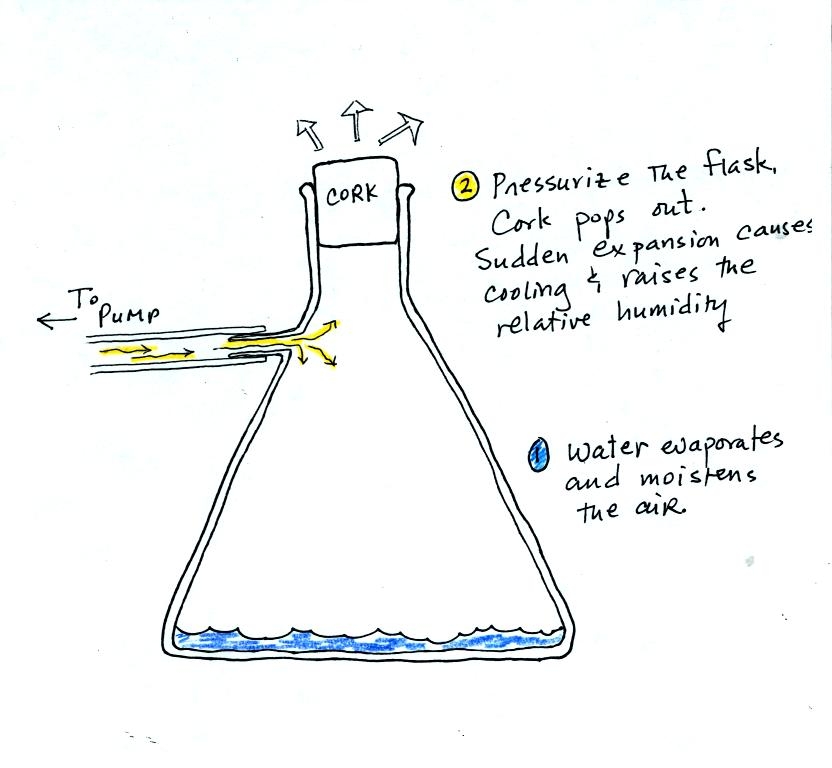
We used a strong thick-walled 4 liter flask (flasks
like this are designed not to implode when all of the air is pumped out
of them, they aren't designed not explode when pressurized).
There
was a little
water in the bottom of the flask to moisten the air in the flask.
Next we pressurized the air in the flask. At some point the
pressure blows the cork out of the top of the flask (hopefully).
The air in
the flask expands outward and cools. This sudden cooling
increases the
relative humidity of the moist air in the flask to 100% (probably more
than 100%) and water vapor condenses onto cloud condensation nuclei in
the air. A cloud became visible at this point. The
cloud droplets are too small to be seen with the human eye. You
can see the cloud because the water droplets scatter light.

The demonstration was repeated an additional time with one small
change. A burning match was dropped into the
bottle. The smoke from the match added lots of very small
particles, condensation nuclei, to the air in the flask. The
cloud that formed
this time was somewhat "thicker" and easier to see (this second cloud
is usually quite a bit thicker and more visible than was the case
during the MWF class demonstration).
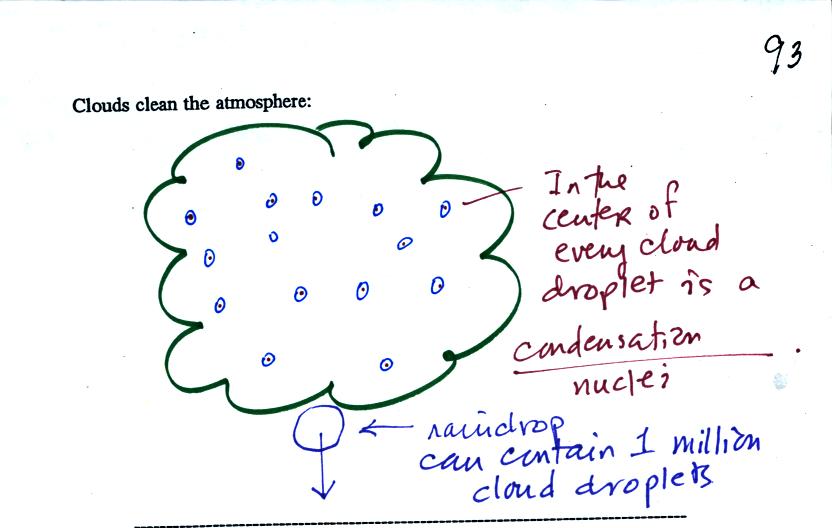
Clouds are one of the best ways of cleaning the atmosphere
(cloud
droplets form on particles, the droplets clump together to form a
raindrop, and the raindrop carries the particles to the ground).
A raindrop can contain 1 million cloud droplets so a single raindrop
can remove a lot of particles from the air. You may have noticed
how clear the air seems the day after a rainstorm. Gaseous
pollutants can dissolve in the water droplets and be carried to
the ground by rainfall also.
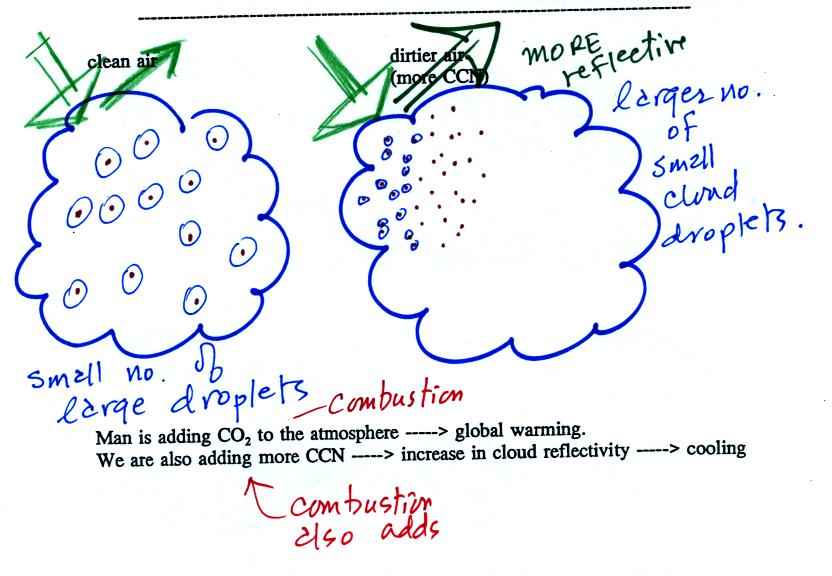
A cloud that forms in dirty air is composed of a large
number of small droplets (right figure above). This cloud is more
reflective
than a cloud that forms in clean air, that is composed of a smaller
number of larger
droplets (left figure).
This is has implications for climate change.
Combustion of fossil fuels adds carbon dioxide to the atmosphere.
There is concern that increasing carbon dioxide concentrations will
enhance the greenhouse effect and cause global warming.
Combustion also adds condensation nuclei to the atmosphere (just like
the burning match added smoke to the air in the flask). More
condensation nuclei might make it easier for clouds to form, might make
the clouds more reflective, and might cause cooling. There is
still quite a bit of uncertainty how clouds might change and how this
might affect climate (remember too that clouds are good absorbers of IR
radiation).
This is a
good point to learn more about how to identify and name clouds.
The ten main cloud types are listed below (you'll find this list on p.
95 in the photocopied class notes).
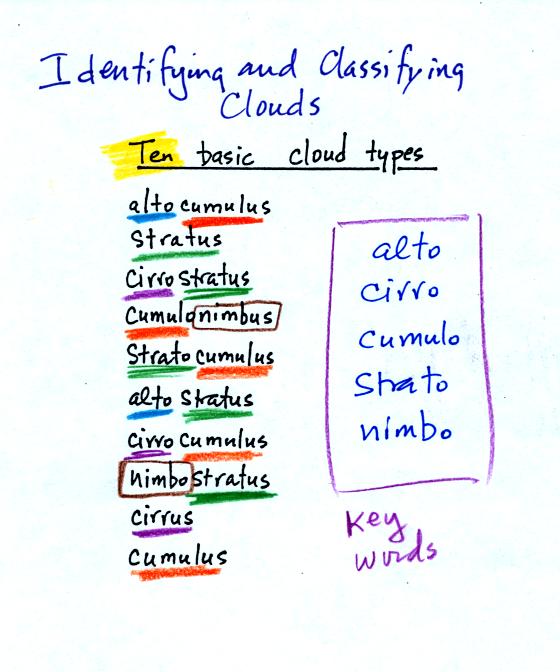
You should try to learn these 10 cloud names. Not just because
they might be on a quiz (they will) but because you will be able to
impress your friends with your knowledge. There is a smart and a
not-so-smart way of learning these names. The not-so-smart way is
to just memorize them. You will inevitably get them mixed
up. A better way is to recognize that all the cloud names are
made up of key words. The key words, we will find, tell you
something about the cloud altitude and appearance.
Clouds are classified according to the altitude at which
they form and
the appearance of the cloud. There are two key words for altitude
and two key words for appearance.
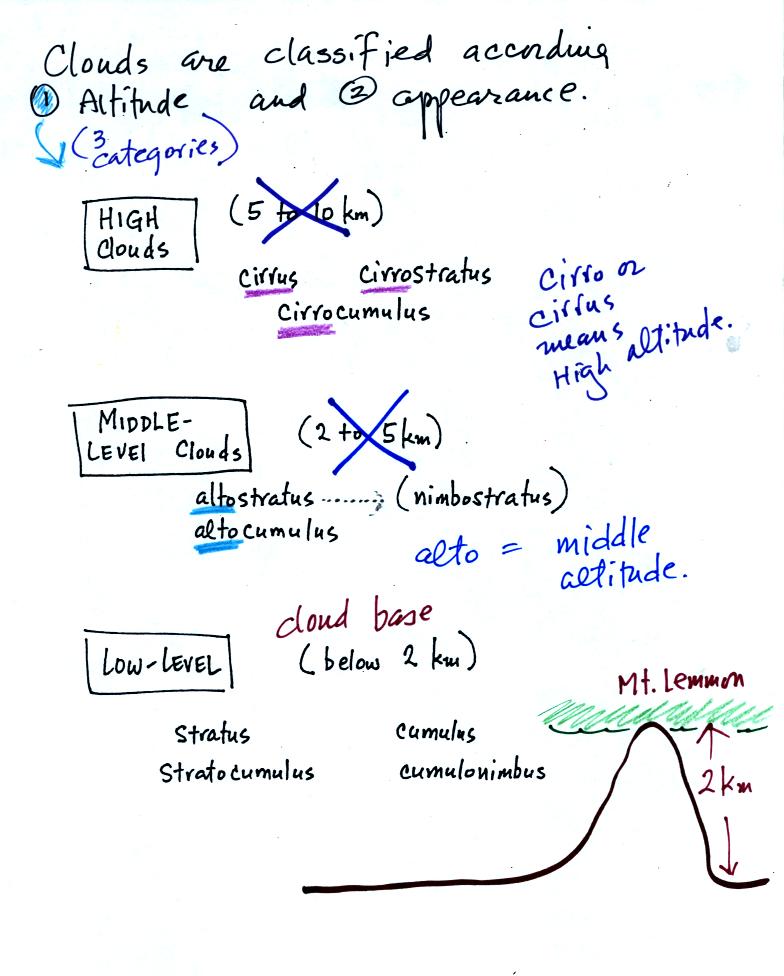
Cirrus or cirro
identifies a high altitude cloud. There are three high altitude
cloud names.
Alto in a cloud name means the
cloud is found at middle altitude.
The dotted line connecting altostratus and nimbostratus indicates that
they are very similar. When an altostratus cloud begins to
produce rain or snow its name is changed to nimbostratus. A
nimbostratus cloud is also often somewhat thicker and lower than an
altostratus cloud.
It is very hard to just look
up in the sky and determine a cloud's altitude. You will need to
look for other clues to distinquish between high and middle altitude
clouds. We'll learn about some of the clues you can look for in
class on Wednesday.
There is no key word for low altitude clouds. Low
altitude clouds
have bases that form 2 km or less above the ground. The summit of
Mt. Lemmon in the Santa Catalina mountains north of Tucson is about 2
km above the valley floor. So low altitude clouds will have bases
that form at or below the summit of Mt. Lemmon.

Clouds can have a patchy of puffy (or lumpy or wavy)
appearance. These are cumuliform clouds and will have cumulo or
cumulus in their
name. In an unstable atmosphere cumuliform clouds will grow
vertically.
Stratiform clouds grow horizontally and form layers. They form
when the atmosphere is stable.
The last key word, nimbo or nimbus, means precipitation. Two of
the 10 cloud types are able to produce (significant amounts of)
precipitation.
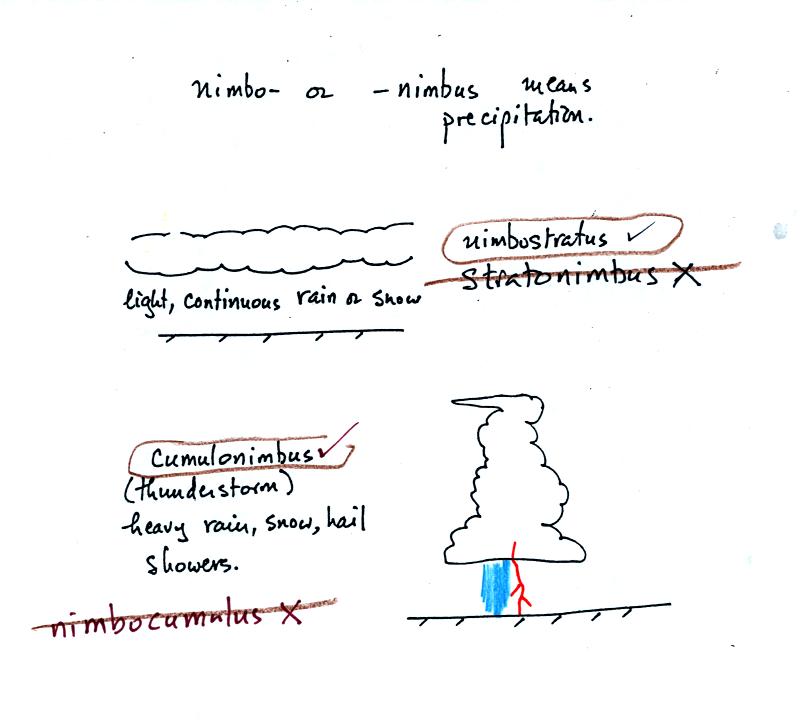
Nimbostratus clouds tend to produce fairly light
precipitation over a large area. Cumulonimbus clouds produce
heavy showers over localized areas. Thunderstorm clouds can also
produce hail, lightning, and tornadoes. Hail would never fall
from a Ns cloud.
While you are still learning the cloud names you might put the correct
key words together in the wrong order (stratonimbus instead of
nimbostratus or nimbocumulus instead of cumulonimbus). You won't
be penalized for those kinds of errors in this class.
We'll look at pictures of most of the 10 cloud types in class on
Wednesday. Drawings and written descriptions have already been
placed on the Wed., Oct. 24 notes page.
We had
just a little time at the end of the period to look at satellite
photographs. Here is a much more detailed discussion of
three types of satellite photographs. You'll find
these discussed on pps
99-100 in the photocopied class notes (also on pps 240-243 (Chap. 9) in
the 5th eds of the text, pps 236-240 in the 4th edition of the text)
The most common type of satellite photograph is an infrared
satellite
photograph. We had time to discuss this briefly in class.
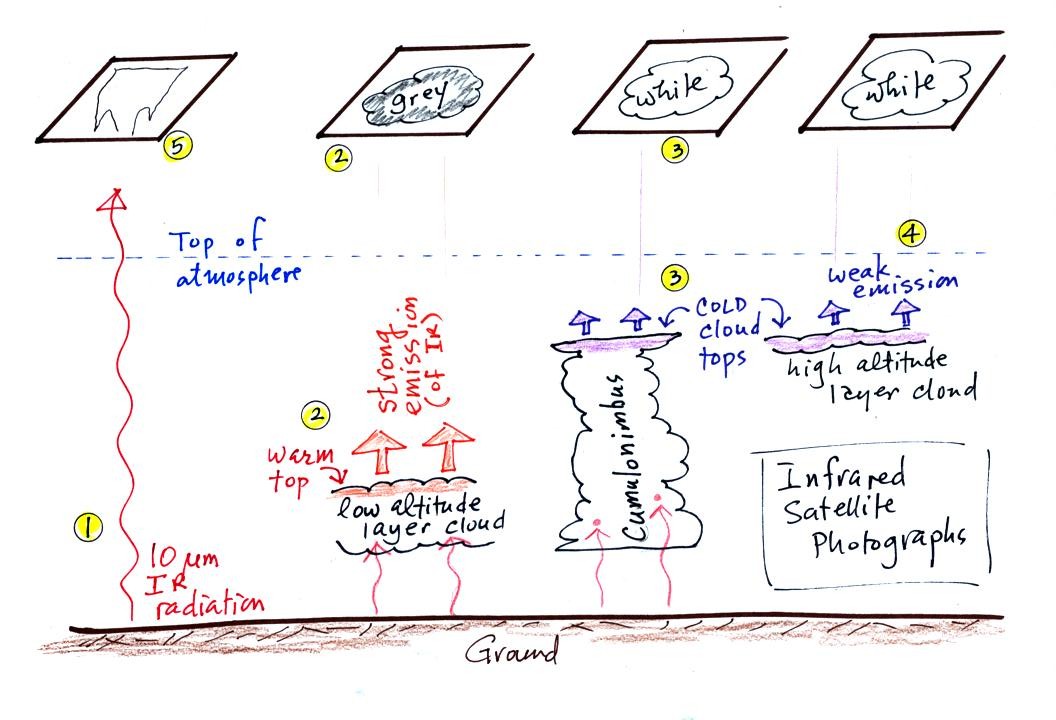
1. An infrared satellite photograph detects the 10 um IR
radiation
actually
emitted by the ground or by clouds. You don't depend on seeing
reflected
sunlight, so clouds can be photographed during the day and at
night. You may recall that 10 um radiation is in the middle of
the atmospheric window, so this radiation is able to pass through air
without being absorbed.
2. Clouds absorb 10 um radiation and then reemit
radiation. The top surface of a low altitude cloud will be
relatively warm. Warmer objects emit IR radiation at a greater
rate or at higher intensity (the Stefan Boltzmann law from Chap.
2).
This is shown as grey on an IR satellite photograph. A
grey unimpressive looking cloud on an IR
satellite photograph may actually be a thick nimbostratus cloud that is
producing a lot of rain or snow.
3. Cloud tops found at high altitude are cold and emit IR
radiation at a lower rate or at lower intensity. This shows up
white on an IR photograph.
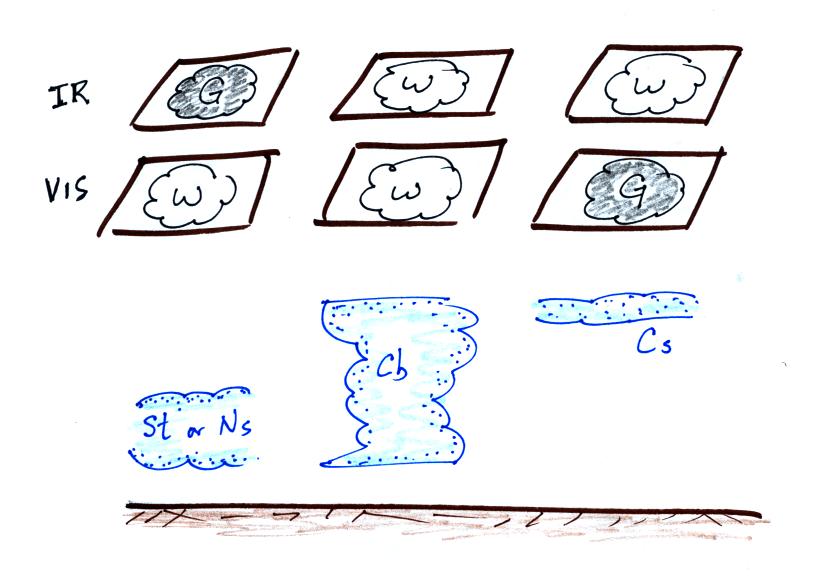
4. Two very different clouds (a thunderstorm and a
cirrostratus cloud) would both appear white on the satellite photograph
and would be difficult to distinquish. Meteorologists are
interested in locating tall thunderstorms as they can produce severe
weather.
5. The ground changes temperature during the course of the
day. On an infrared satellite animation you can watch the ground
change from black (afternoon when
the ground is warmest) to grey (early morning when the ground is cold)
during the course of a day. The ocean right alongside doesn't
change temperature much during the day and remains grey throughout the
day.
The remaining information wasn't
covered in class on Monday. We'll review it quickly at the start
of class on Wednesday.
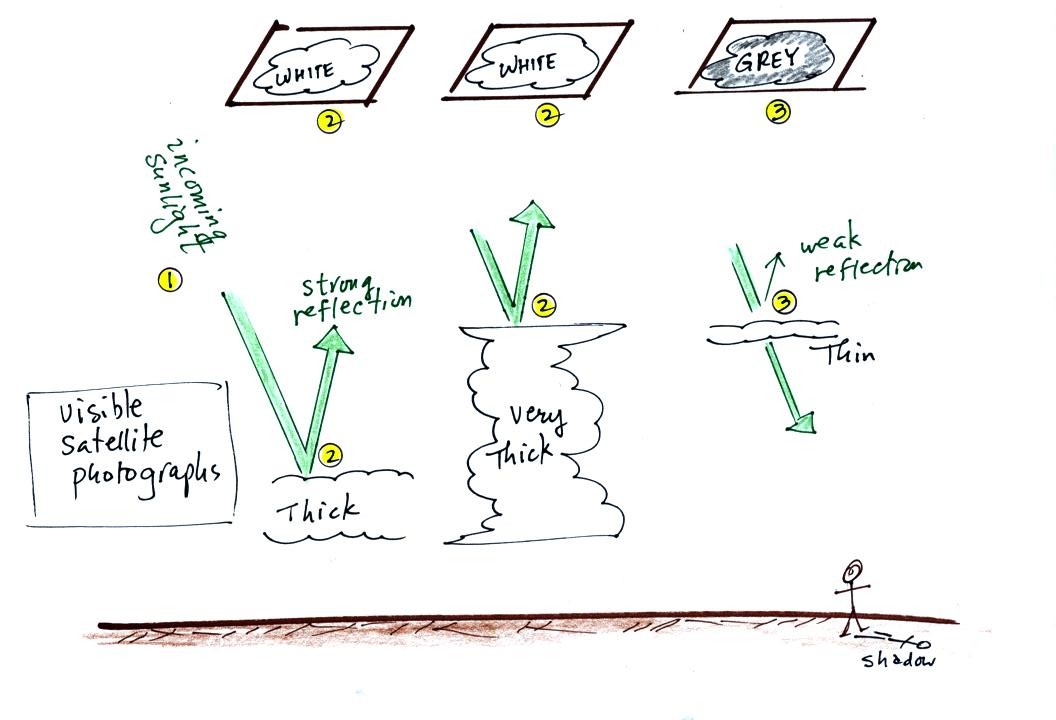
A visible satellite photograph photographs sunlight that is
reflected
by clouds. You won't see much on a visible satellite photograph
at night. Thick clouds are good reflectors and appear
white. Thinner clouds don't reflect as much light and appear
grey. The low altitude layer cloud and the thunderstorm would
both appear white on this photograph and would be difficult to
distinquish.
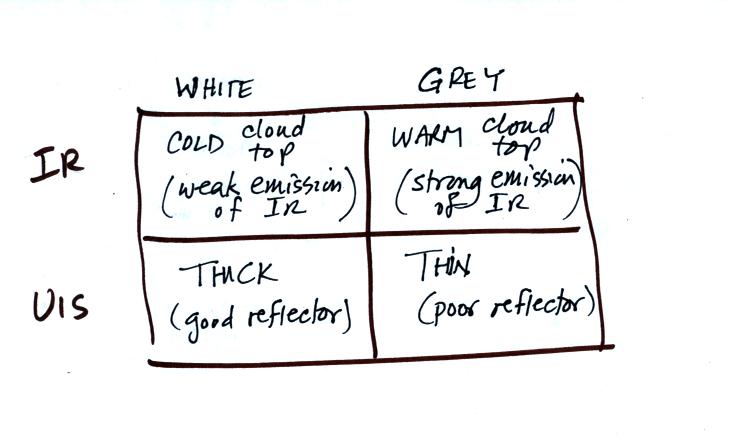
Here's a summary of what we have learned so far.
The figure below shows how
if you combine both visible and IR
photographs you can begin to distinquish between different types of
clouds.
There is one more type of satellite image worth mentioned, a
water
vapor image.
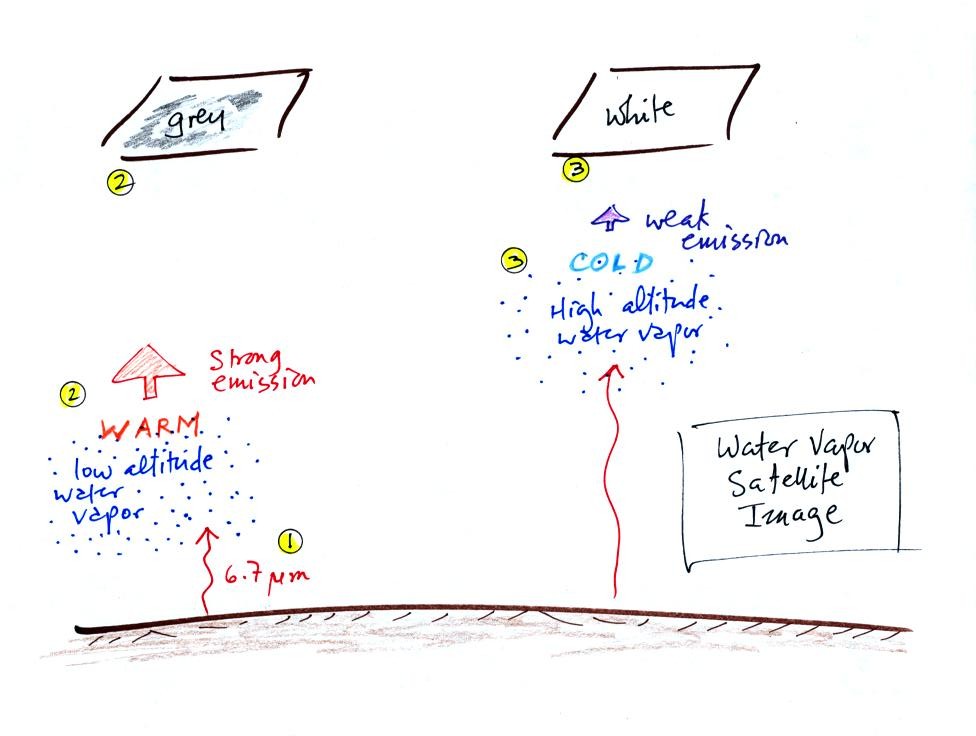
This is also a type of IR photograph. It detects a
different
wavelength of IR radiation. 6.7 um radiation is absorbed and
emitted by water vapor in the atmosphere. Warm low altitude water
vapor appears grey and unimpressive. Higher altitude water vapor
appears white on the satellite photograph. But
remember the high altitude
air is cold and there isn't much water vapor up there. The
utility of these photographs is not to show you whether a lot of
moisture is moving into an area but rather they reveal wind motions in
regions where there aren't clouds.


